Working with COBI.time
Table of Contents
What is COBI.time?
COBI.time is an efficient personnel time recording in SAP Business One. It is a time recording system for modern medium-sized companies.
Whether on the move, in the office, on the construction site or when visiting a customer: COBI.time is your lean and modern solution for SAP Business One, which meets all the requirements of Modern working time recording everywhere and anytime.
- Commissioning with a few hours
- Device-independent use e.g. any web browser and Mobile devices
- Multilingual user interface and can be used internationally
- Exclusively for SAP Business One
Purpose and Scope
This document is the User Manual of COBI.time. It is intended to provide all the necessary information to use this software in the process of time recording management. It assists the customer in the use of COBI.time applicable to keep their work time and able to integrate with SAP Business One.
The manual assumes that the readers are familiar with the PC or the Device that COBI.time is installed in. The person who performs COBI.time must have sufficient security clearance and be authorized in accordance with the company’s level of status.
Those individuals with access to the use of COBI.time in connection with classified hardware is required to familiarize themselves with and follow the instructions in this manual.
The manual is developed for medium-sized companies and is exclusive for SAP Business One. It contains five major sections including the Introduction:
- Introduction: describing the product and its importance, the purpose and scope of this user manual, and the general settings.
- Employee Time Records: Describing the process of timekeeping.
- Administrative Functionality: Describing the process of manual time records, users set up procedures, attendance control report, and Password setting.
- Reporting Procedures: Describing the availability of reports and exporting to Excel file.
- Summary: the concluding remarks of the user guide
General Settings
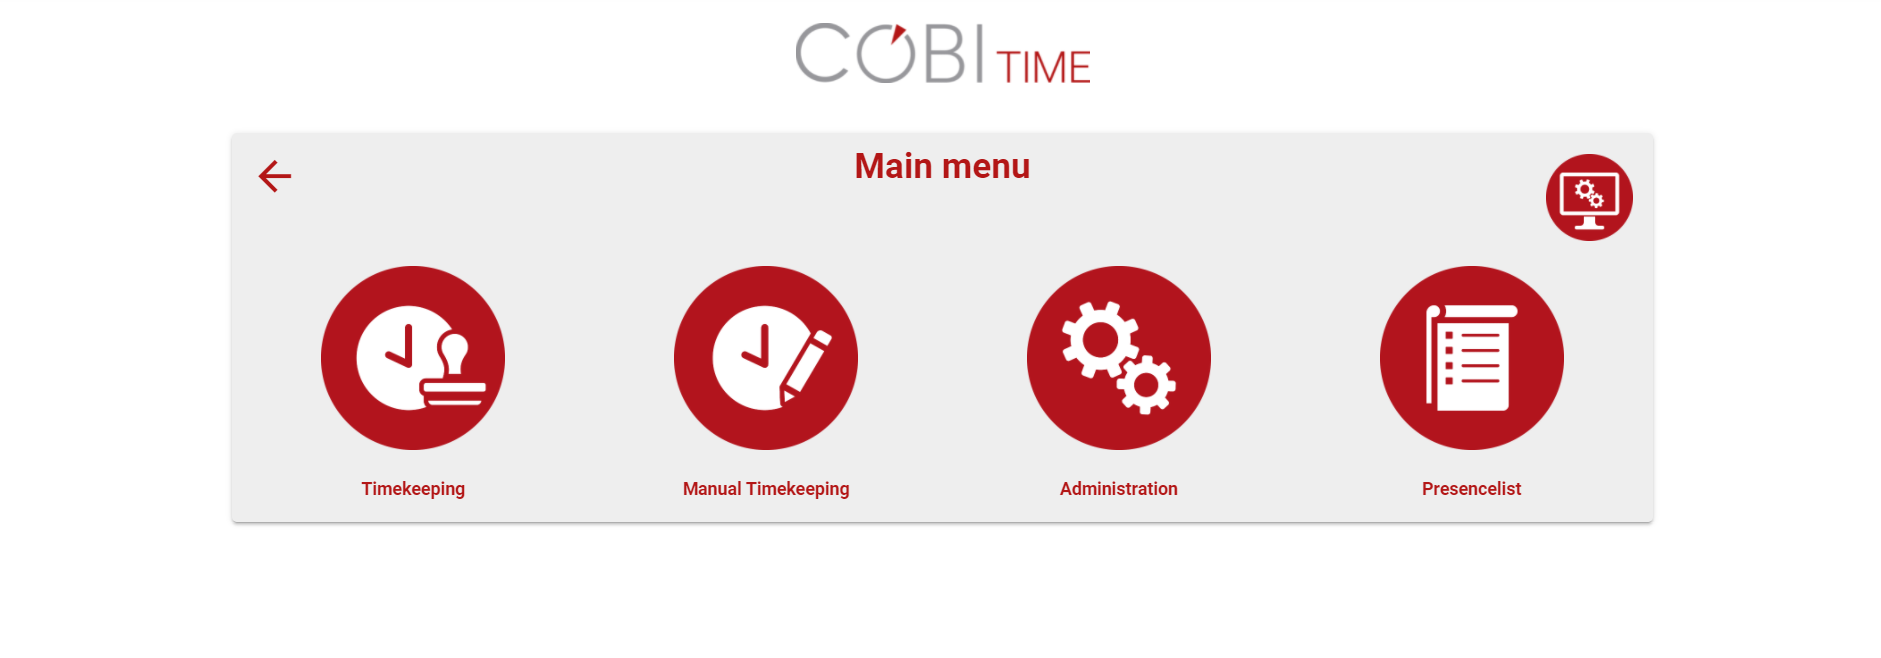
Open device configuration
Configure the device either to a Device or Terminal mode. This is how the first log-in window of COBI.time appears. Thus with your choice of preference, you can configure the device and save it for the future. To do this:
Step 1: Main Menu → Open Device Configuration
Step 2: Click Computer Icon to choose from the drop-down lists of the configuration mode.
Step 3: Click on Save
Language Setting
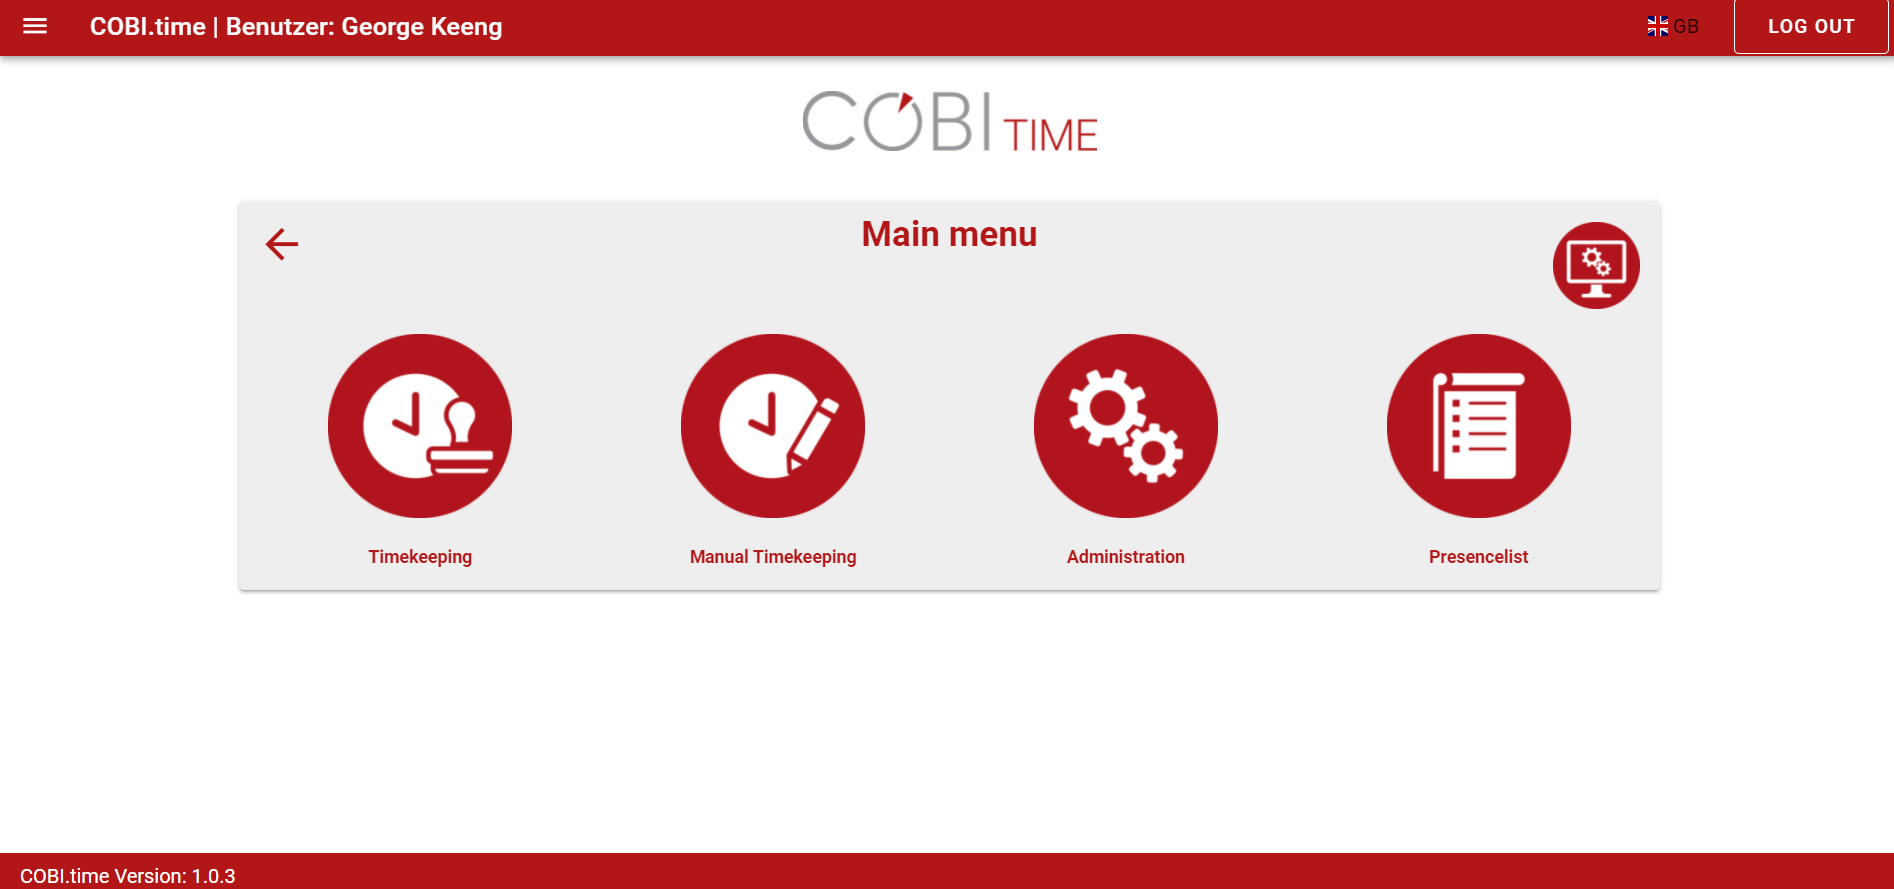
Once you Log-in to COBI.time, the Main Menu Window gets open. At the top right corner of this open Window, you choose your preferential language to work with. For example German or English.
Employee Time Records (Working with employee time keeping process)
For security and control purposes, an administrator or an authorized individual can have the right to start on COBI.time or automatic start option can be available. Then the system will be ready for use.
Start
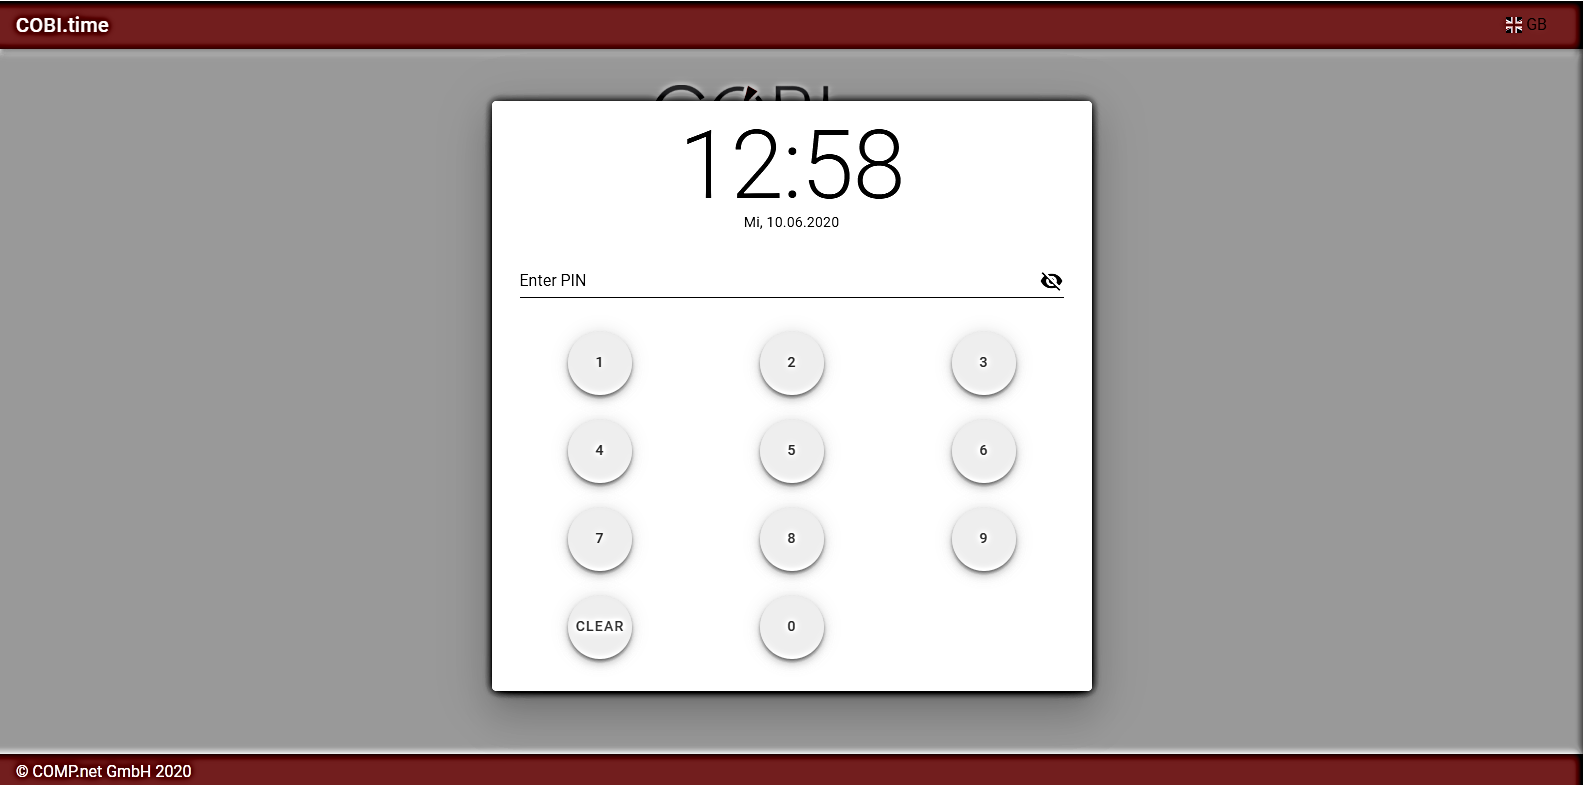
Assume all the processes of installation and Integration with SAP Business One are completed. As an administrator or authorized employee you can start COBI.time either from the web browser or double click on the icon from the desktop. Then you will get the following window displayed:
User Account log-in
After starting COBI.time, Log-in window displays. Then do this:
- Step 1 Give user name and password
- Step 2 Click LOGIN
Or:
- Step 1 Simply click the PIN Button
- Step 2 Give PIN Code
COBI.time Main Menu
Menu List
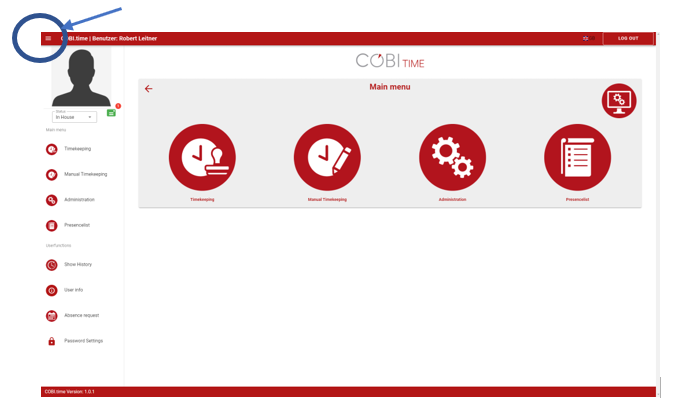
You can display the list of the main menu on the left side of the COBI.time window. You click on the Top Left Corner of the opened window and see the Menu list:
Change Profile Picture
To change the profile picture, click on the picture box.
If you want to insert another picture, click on the Picture Box and select the required photo from the source and open. Then you get the new picture in its place.
Attendance Status
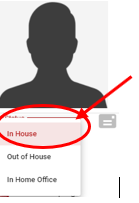
On the bottom of the Profile picture, it shows the Status: In House. This indicates the status of the attendance (In House, Out of House or In Home Office) during the regular working hours. The status can be depending on the activity or task an employee is engaged in. The activity can be a project (out of office), working from home (in Home Office), present in the office or absent.
Mail Notification
Mail Notification alerts you by displaying an icon in the notification area. Notification behaves exactly as one would expect, it sends a notification message to your inboxes. You want to open the Notification board. You should do this:
Click on the Notification board toolbar ![]() on the Right Bottom Corner of the profile picture box. The number 1 indicates the number of messages available in the inbox.
on the Right Bottom Corner of the profile picture box. The number 1 indicates the number of messages available in the inbox.
To mark the message status as Read or Unread, Select the respective Message, then click on Mailbox![]()
To delete the message, click on delete ![]()
To choose the display of as many as the number of rows per page, click on the Down Arrow  at the bottom of the window.
Note:
If the message box is empty, you cannot take any action. But if you have some available messages under Notification Window, you can select or deselect using the checkbox right to the message contents.
How Timekeeping works
Timekeeping is a great advantage to your administrative processes. It supports your organization or company in keeping track of the working hours performed by your employees.
As an employee, you check-in and check-out into COBI.time; thereby, your time for the job performed is recorded. To do this you must:
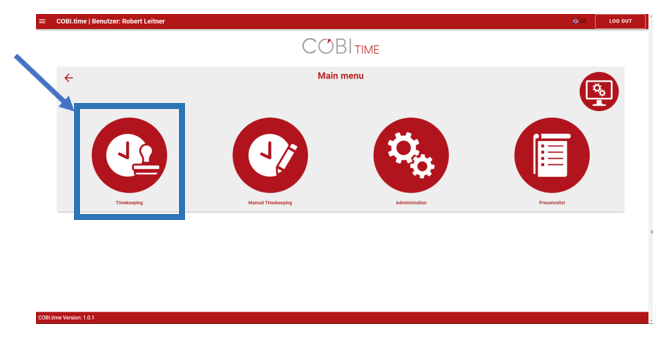
Log-in into COBI.time → Main Menu → Timekeeping
or
Simply click on the Timekeeping icon from the toolbar:
Timekeeping for work Category:
COBI.time enables employees to record working times and assign these to a project or as regular work time. The first step you do is to log-in using either your PIN Code or User name with a Password.
a) Record regular Work Time
Step 1: From the Main Menu Window, Click on Timekeeping
Main Menu → Timekeeping
Step 2: Click on Come to begin the time record
Main Menu → Timekeeping → Come
Note: In case there exist a Break Time, you stop the time. To do this:
Click on Pause Start
When the Break time is finished, click on Pause End
Step 3: Work time ends, Click on Go
Main Menu → Timekeeping → Go
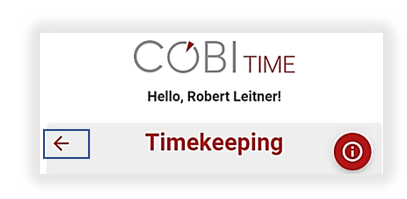
Step 4: Return back to Main Menu Window, Click on Back arrow.
Step 5: Leave the Main Menu Window, Click on Back arrow again.
Note: The total time spent in performing the day's job is automatically saved in SAP Business One and included in the month's report.
b) Record Project Time
Project time is the time that an employee performs for a particular project. In this case, COBI.time has an option to record the time spent on a certain project. To do this: To start the project work time, click on Project Start
Main Menu → Timekeeping → Project Start ![]()
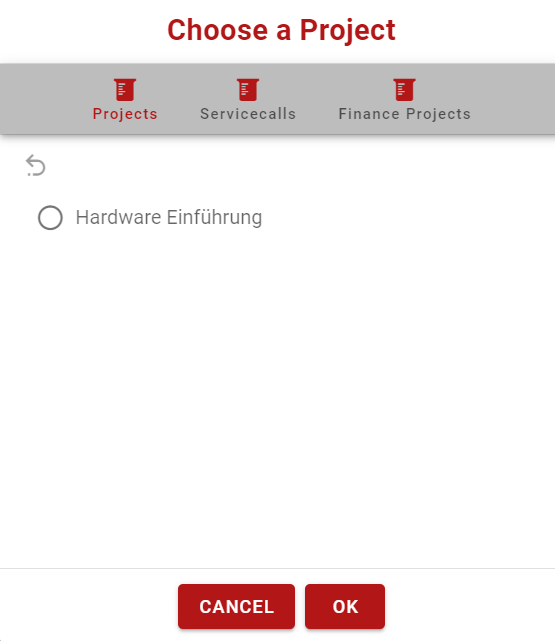
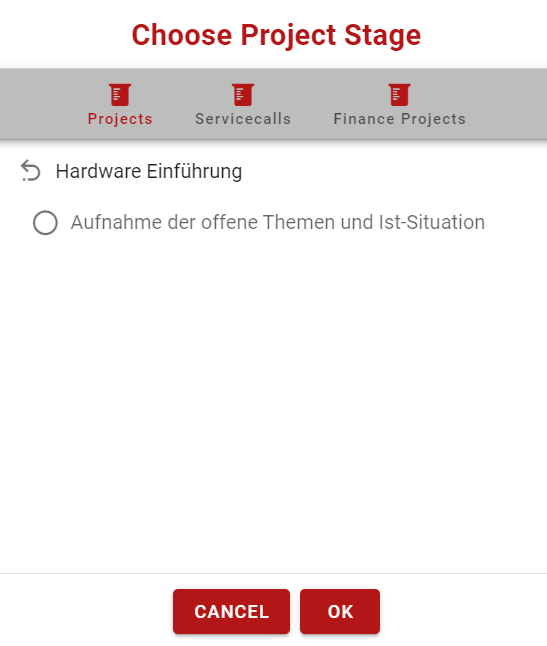
In this case, there are options to choose from the project type such as Projects, Service calls and Finance Projects.
In the projects section, we can see if there exists an ongoing project to select from and then continue as going down to the stage level until we get the required project stage.
Choose a project stage. For example, Hardware Implementation.
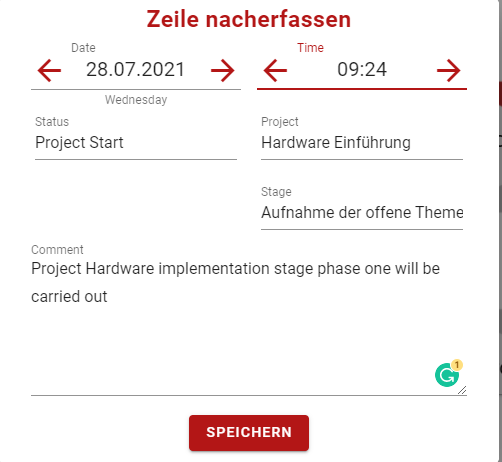
Choose an activity within the project stage. For instance, recording of open issues and current situation.
Click on save.
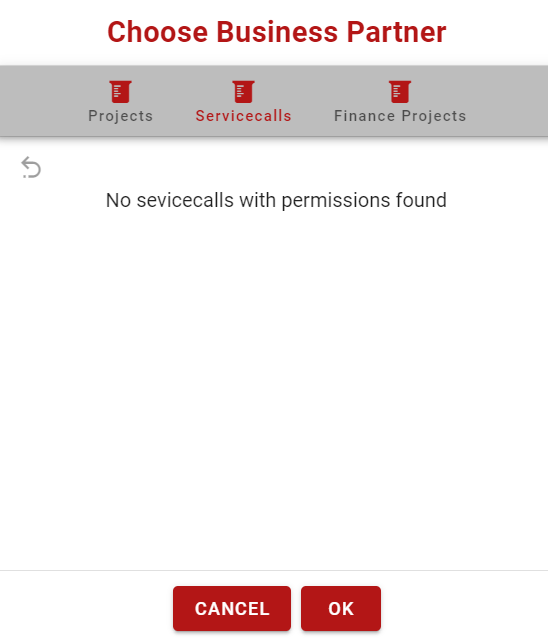
The second option is to choose Service calls if available. In our example, there are no existing service calls.
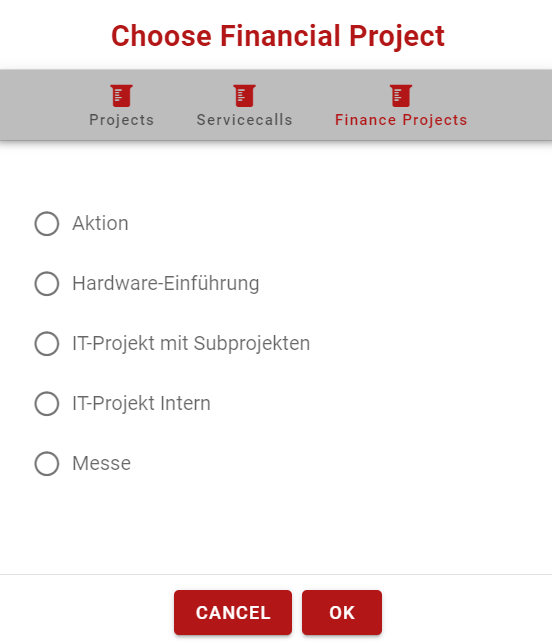
The third option is the availability of Finance projects from which we have to choose in order to carry out the process.
Click ok to proceed. Then it displays
Click on Save
To end the project work time, click on Project End
Main Menu → Timekeeping → Project End
View Recorded Data / User Information
The total time an individual spent in performing a certain job is available for you to check. For a particular month or working day, the history view is available. It is also possible to edit the already recorded data. These are available using the show information option. To do this:
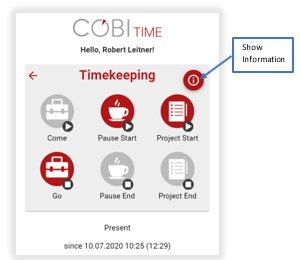
Main Menu → Timekeeping → Show Information
From the Top Right Corner of the Timekeeping window, click on Show Information button ![]()
Or
Main menu → User Info
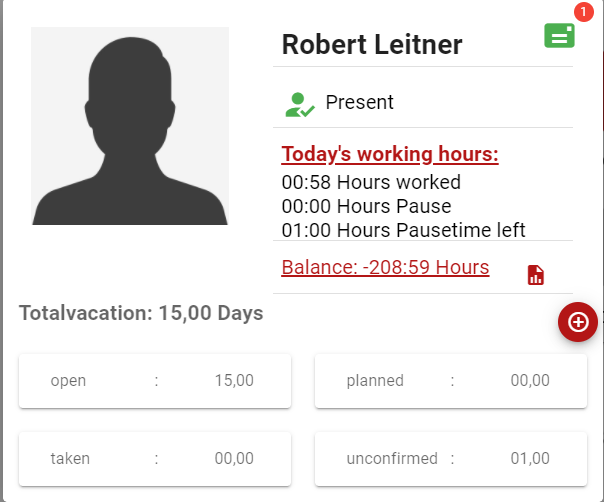
Then the display looks like:
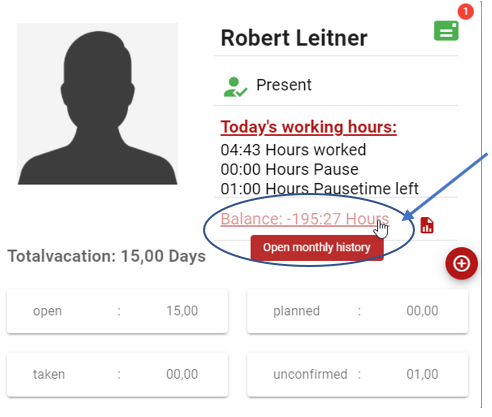
As shown in the figure above, the displayed options are attendance notification (the message status either present or absent for the current user), the day’s working hours, the balance or time report, total vacation status and absence request  options.
Another information available for you is the total vacation in days, vacation days remained open, planned, taken, and unconfirmed (requested but not yet approved).
Message Status inbox (Notification on the attendance status)
In this case, once we click on the Message status notification inbox![]() , it displays the messages available for this particular user or employee. The green box indicates the availability of the stored messages and the number, for example 1 in our case, shows one message is available.
, it displays the messages available for this particular user or employee. The green box indicates the availability of the stored messages and the number, for example 1 in our case, shows one message is available.
Daily History View:
As an individual, you performed a certain job and recorded your work time daily in COBI.time. At the end of the day or being at the current date, you want to view the status. To do this, go to the Main menu as:
Main Menu → Timekeeping → Show information → Today’s Working Hours
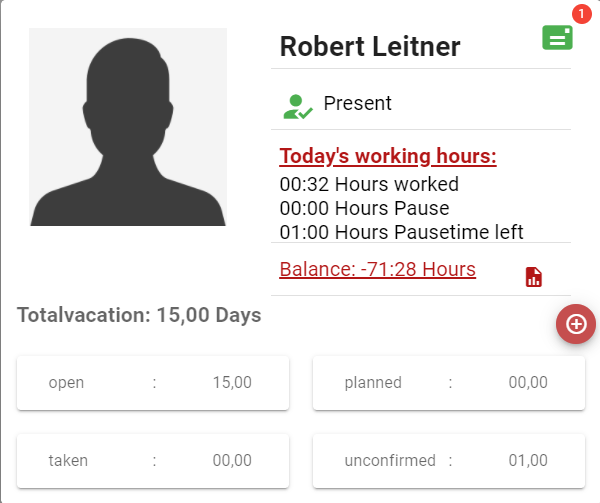
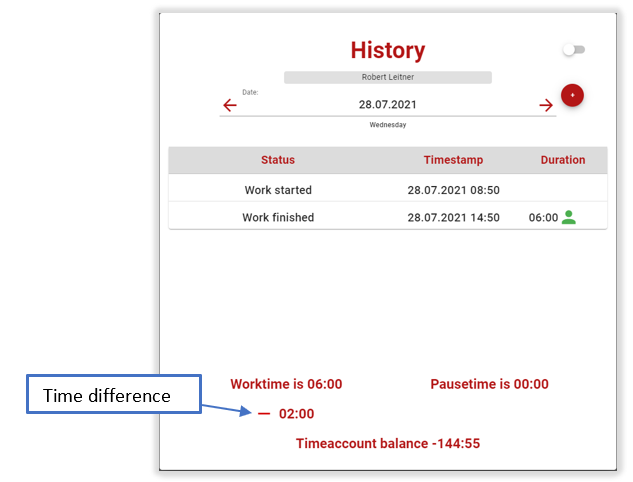
During the current date, we can see the status of Start and End time, total worked time, difference between daily work time and actual time worked, total break time, and time account balance at a glance.
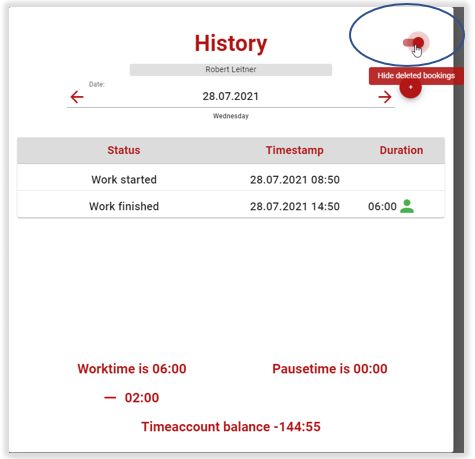
You can also show and hide the deleted bookings by clicking at the top right corner button in the history window 
Edit History
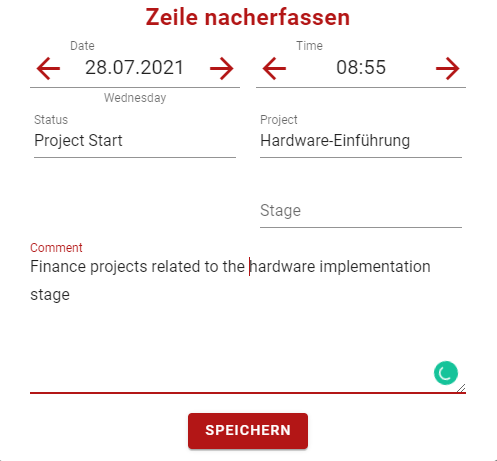
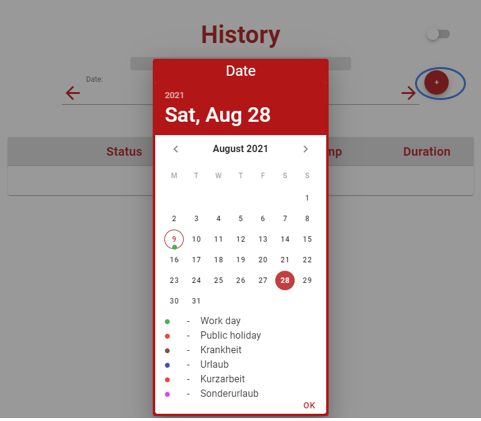
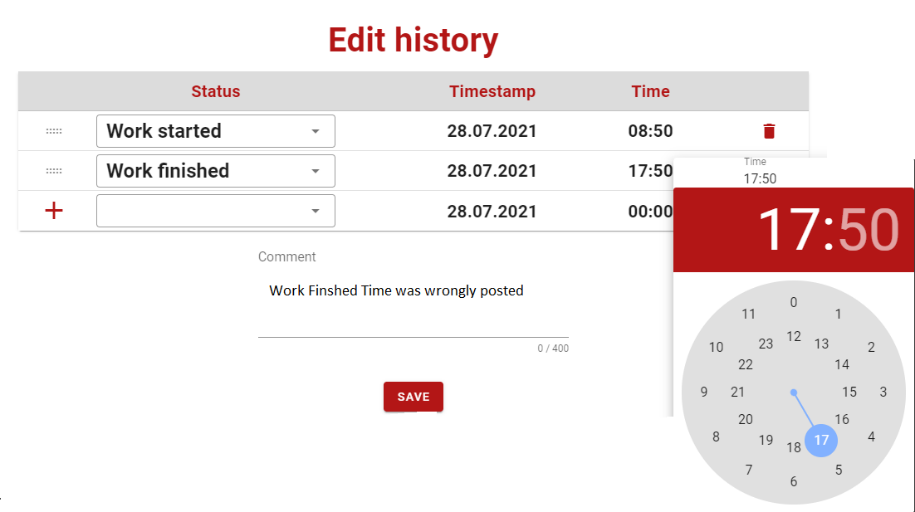
Step 1: You can also edit history by clicking at the plus button as you can see in the picture to the left.
First, move to the required date on correction using Right and Left arrows. You can also click on the date-line that opens the calendar option to select the required date. Then go to editing.
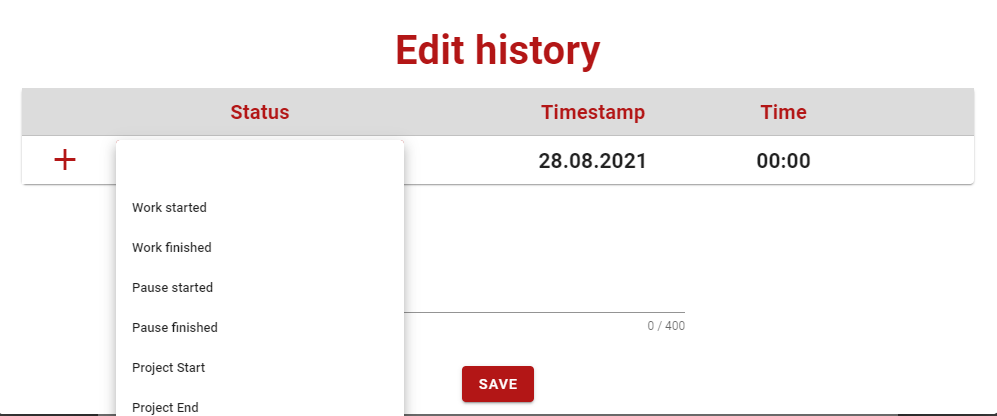
Step 2: Go to the Status section and select the required option from the drop-down list.
Step 3: Include the required information, for instance, change the work finished time from 14:50 to 17:50. Then click the Save button. Confirm if the changes are correct to be saved. Click on Ok, if you want to save the changes. If no action is required, click outside the edit window to cancel the action.
Note: Include comments since they are mandatory in this case.
Furthermore, please consider the sequence while entering the timely data. They must be in the correct order, otherwise, the line will be marked in red and no further action can be taken. For example, if you try to include work that started at 10:55 and ends at 09:54. It will be marked in red. See below:

If deemed necessary, use the Trash can ![]() on the right side of each record in order to delete the wrongly put data. Then confirm the deletion.
on the right side of each record in order to delete the wrongly put data. Then confirm the deletion.
Monthly History View
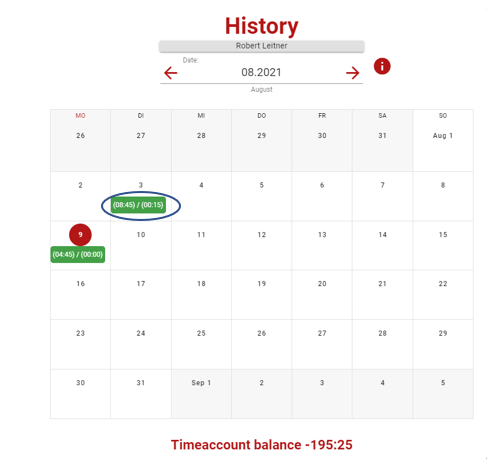
The total hours spent during the month can also be viewed in COBI.time at a glance. Based on the show information window, you can click on the open monthly history button as shown below.
Then the window below opens, and you can view the selected months’ time account balance and status of each day-time record in the month.
Edit history: it is available from this section. Click on the respective date that requires editing. For example, select the date July 07, 2021, from the table on the left. Then the records will be ready for editing. (Follow the steps similar to the Edit history section)
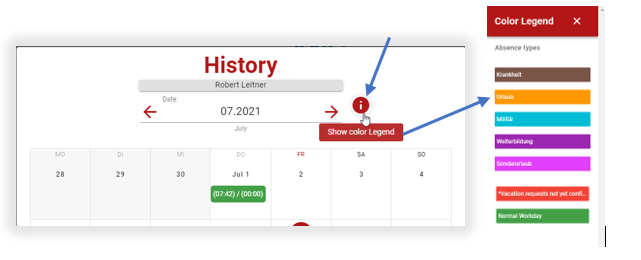
Legend Colour selection: You can also choose the legend color of preference for each status on display.
Monthly time report: Another option available in the show information window is the selection of the monthly time report.
Once you click on the Time report button ![]() , automatically the existing month’s report is displayed. (See for more details in section Report procedures.
, automatically the existing month’s report is displayed. (See for more details in section Report procedures.
Absence Overview and Absence Request
In this section, we see how to display absence overviews and request for an absence. The absence reasons could be vacations, sick leave, etc.
Absence Overview
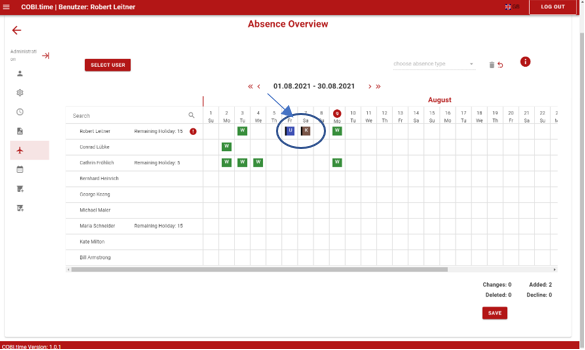
Absence overview can be displayed through Administration → Absence Overview. The display can be individual or group of employees depending on the specified data for selection. Let’s assume we need to display the overview for all employees, then it looks like this:
Absence Request
It is also possible to add or remove the absence request from the Absence overview window. Click on the required date to add the absence request. Provide reasons for absence. Then save the changes when required. Before saving, the date column on selection will become half coloured.
Absence request approval procedures can also be carried out from this section. Click on the pending information on absence for approval and confirm the acceptance or rejection of the request.
Then Provide the reason and click on Accept or Decline.
Another procedure for Absence Request goes through the main menu Absence Request. The absence status could be for a number of reasons such as Sick leave, vacation, public holidays, reduced time of work, or other. To do this,
Step 1: Click on the display button ![]() on the top left corner of the main window. Then click on Absence request.
on the top left corner of the main window. Then click on Absence request. 
Step 2: Provide the reason for the absence from the drop-down list. And also, the date that this absence to be applicable for. Notice that the legend colour for each type of activity is displayed below the calendar table.
Step 3: Click on Request Absence
Note: Once the absence is requested, whoever the manager in COBI.time is or the team leader in the respective department will get the notification. Then the approval decision will be made.
Time Spent on a Project
In COBI.time, it is possible to track total amount of time spent on a project. Employer will be able to check the employes working time on a specific project stages.
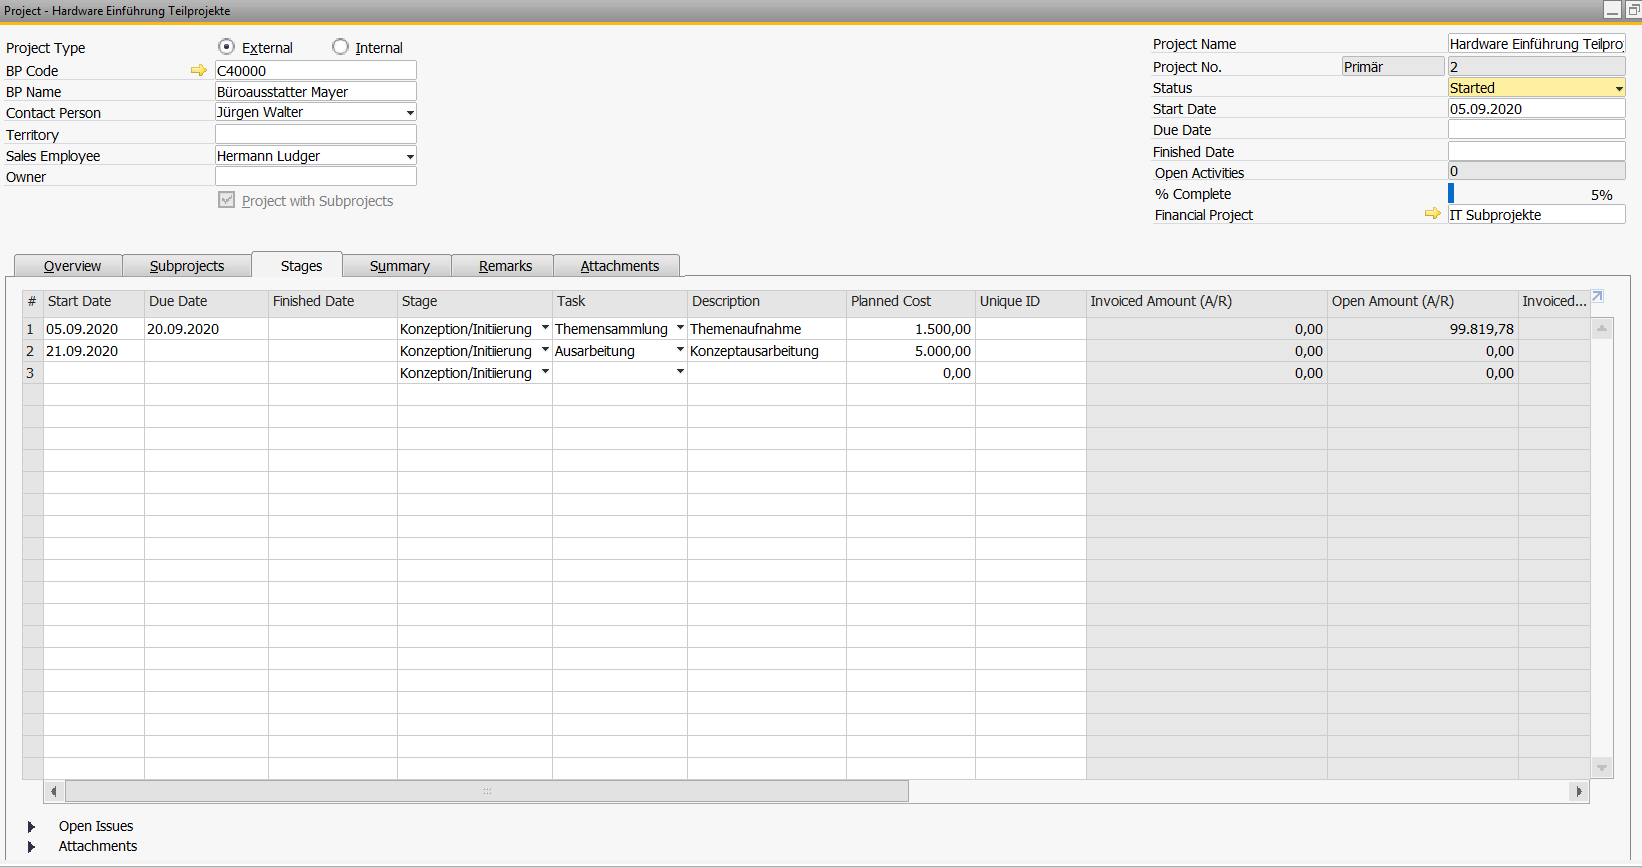
Step 1: Please open Project section in the SAP Business One and select a project
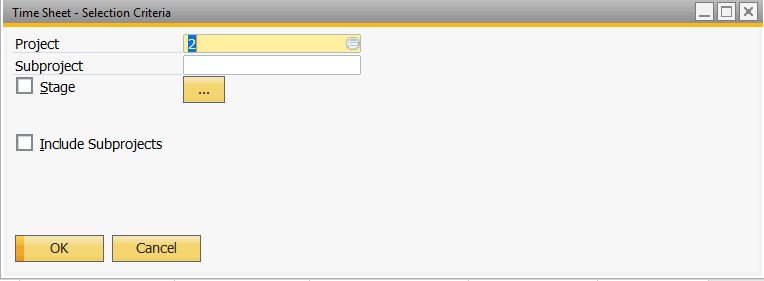
Step 2: Right click and select Time Sheet Report .You will see the page below. Select the project stage and click OK
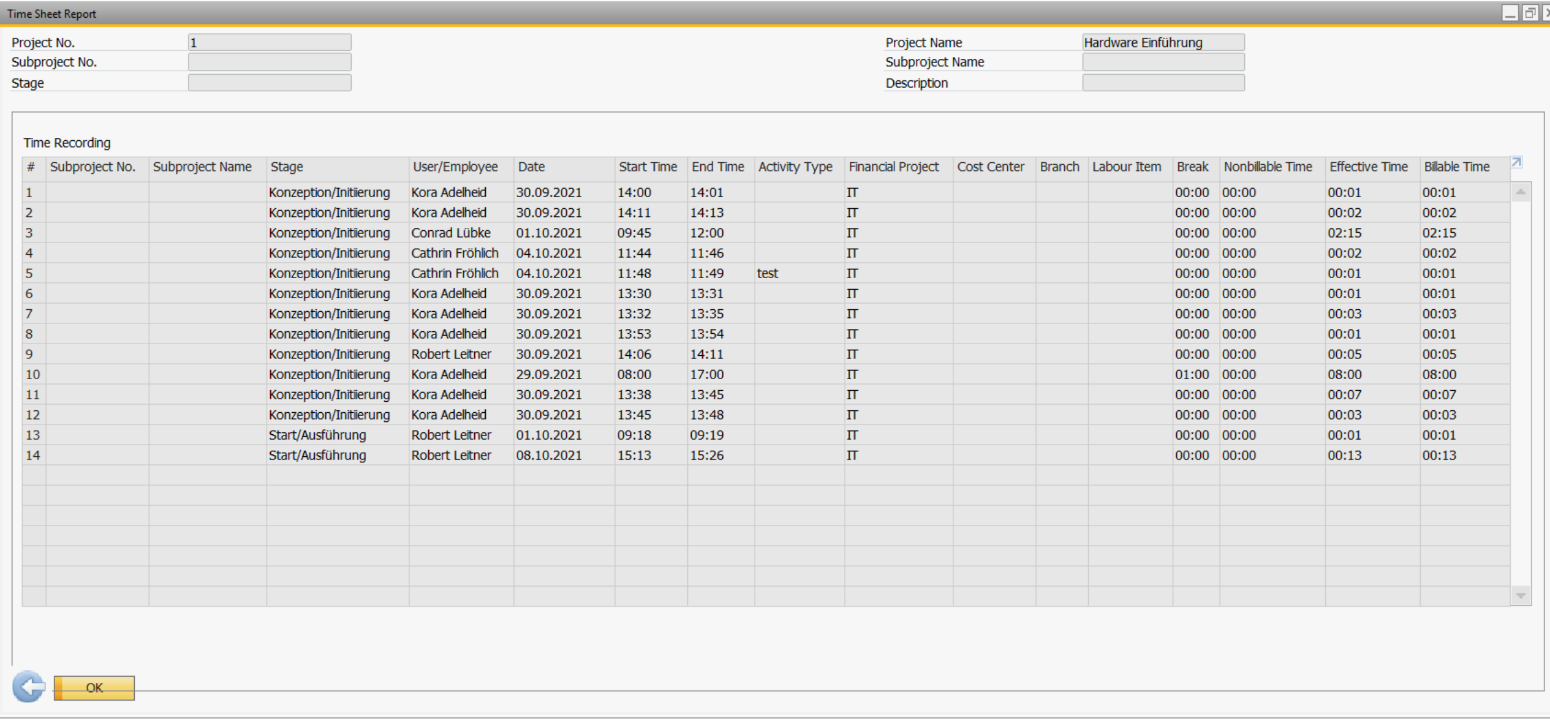
Step 3: Here you can find all project times that have been booked for this project.
Working with Manual Timekeeping and User Administration
Manual Timekeeping
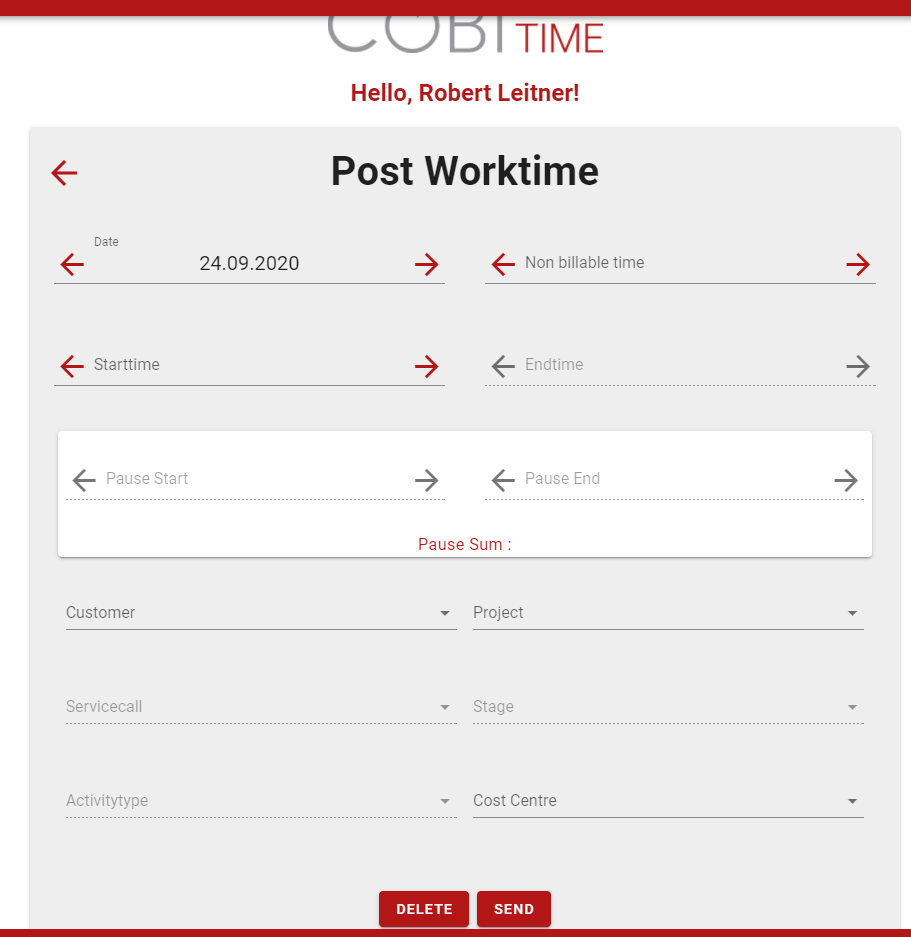
The Manual Timekeeping process provides detailed information for you to include in order to record work time. Manual timekeeping can flexibly be used especially for teams with flexible schedules. To organize timekeeping with manual entry, use Manual Timekeeping to allow you to log your time expenses with a detailed breakdown of the time spent. The details you are required to include are date, Nonbillable time, Start and End time, Break-time, Customer, Project, Service call, project stage, activity type, and cost centre.
Step 1
Open Manual Timekeeping window
Main Menu → Manual Timekeeping
Step 2
Enter the required information; for instance, Date, Nonbillable time, start time, end time, pause time, customer, project type, Service call, Project stage, Activity type, and cost centre.
Step 3
To complete the process, click on Send or if you no longer want the data, click on Delete.
Note: You can only book manually when there is no existing time block. You cannot book time while you are working or work is in progress. Since service calls and projects are permission tied, you may find the display empty unless there exists an ongoing process. You can add a cost center in this section and nowhere else.
Administration
The application of the Administration section of COBI.time enables account administrators to manage the individual users and lets them configure a number of settings for each user account. The functionalities in detail are given below:
User Administration
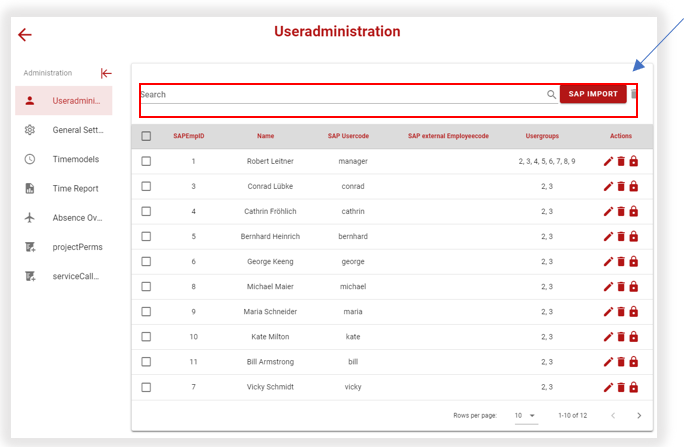
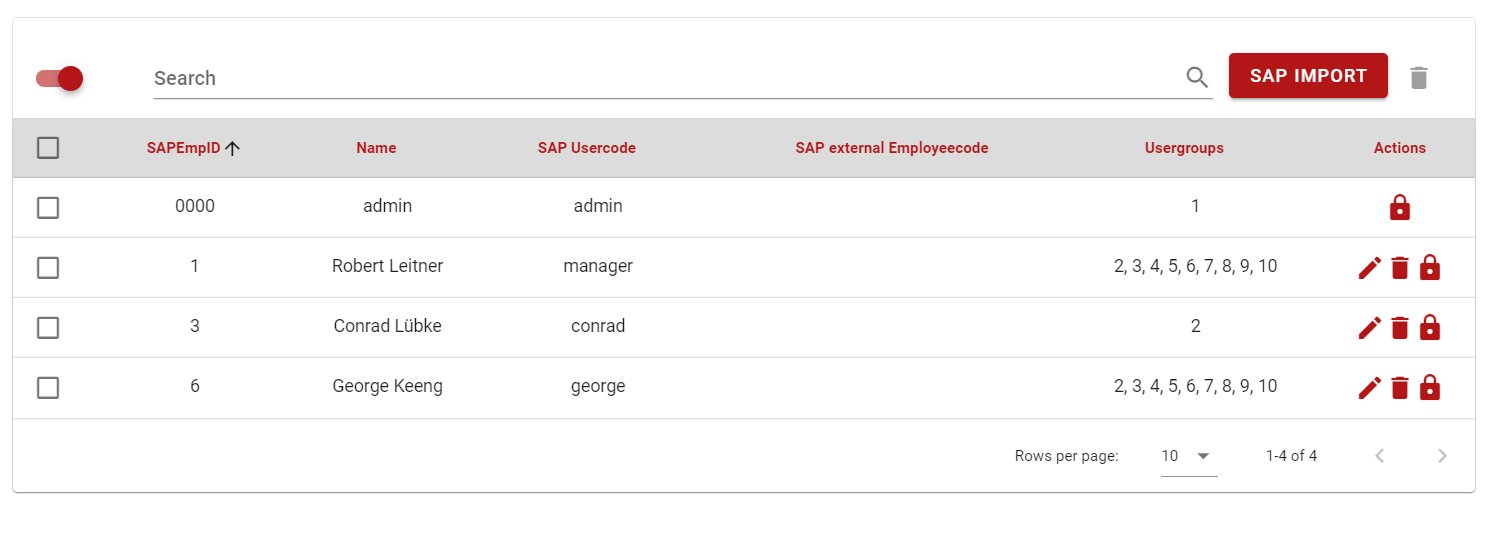
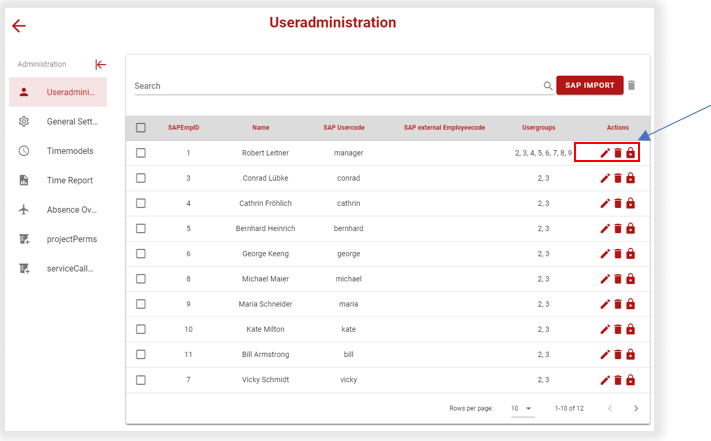
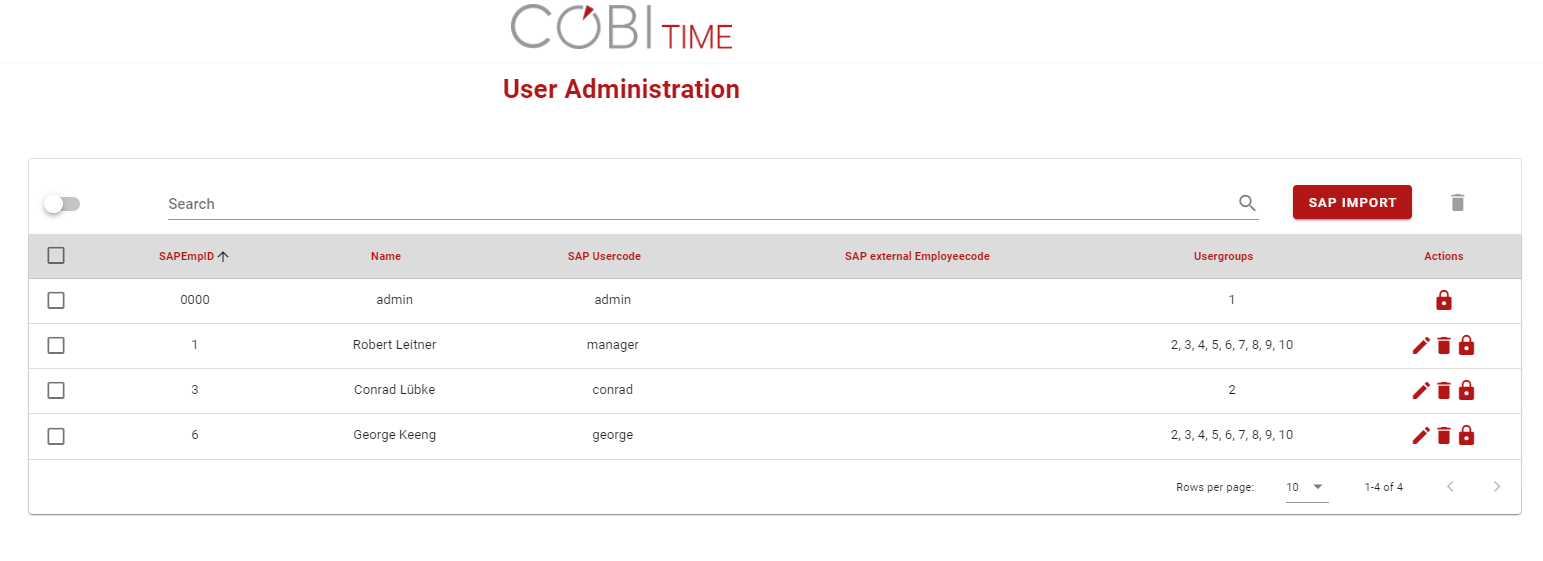
This section displays the available user data in COBI.time. The main user administration screen provides information about SAP Employees Id, Employees Name, SAP User Code, SAP external employee Code, User groups, and Actions.
You can manage user account as per your requirements. This, you can manage in: Import SAP user.
Import SAP User
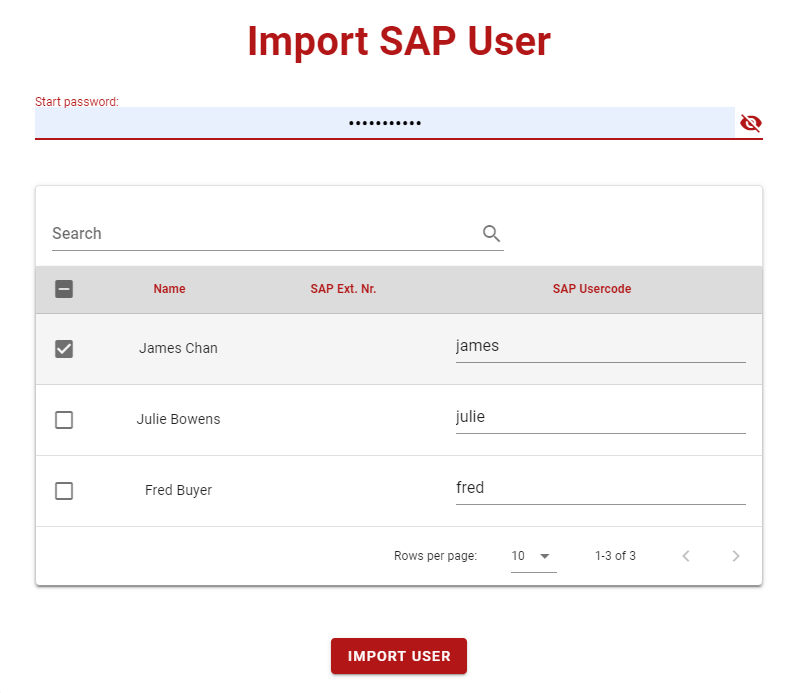
Importing SAP user data is an available function in COBI.time. For data transfer execution, access to SAP users is required. Once you click on SAP Import button  from the Top Right Corner of the User Administration screen, then you see the following screen displayed:
Give a password, search and select the required user data, then click on Import User. To
return back or cancel, click outside the import user window.
How to search user account from the available list, click on the search field and put a keyword to help you in finding the user account. Then, select the relevant user.
Note:
You can also have an option to hide or show inactive users. Click on the icon ![]() left side of the search field.
left side of the search field.
How to edit, delete, and reset password
Edit
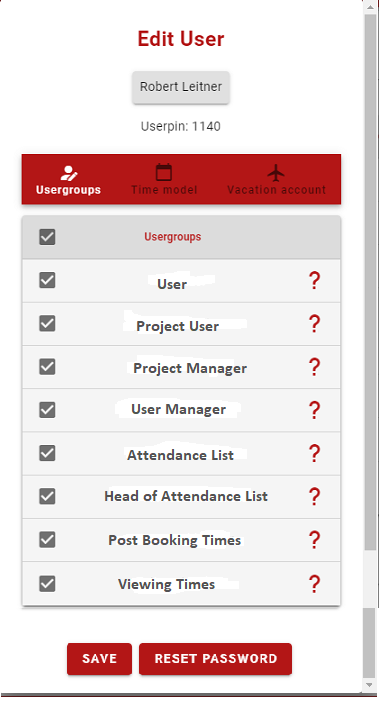
The Edit User screen provides an option to deal with user group identifications. You can select as many user groups as per user depending on the status of each user. Then the user can have access to each relevant group data in COBI.time. You can also view and work on the user required time model and vacation account.
User Group Selection Option:
Select as many user groups as you can depending on the user authorization status. Then the user has access to each selected group data accordingly.
Time Model
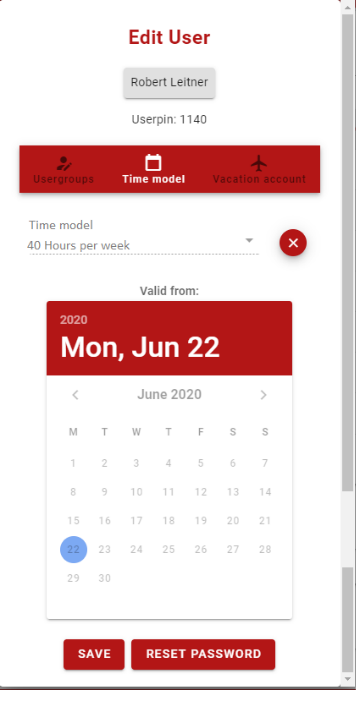
Once you click on the Time Model tab of the Edit User window, you can have a time model and validation date displayed.
Note: You have a separate section on time models (section 3.2.3 on page 25) where you can add daily- and weekly models as required by your business.
Remove Time Account
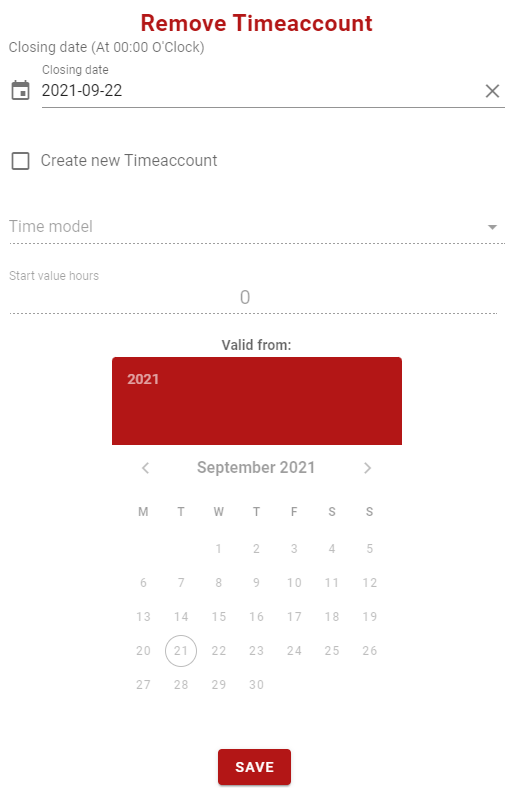
You can remove the time account at this level by clicking on the  button from the Time model screen above. Then the screen below displays. You can put the relevant data such as closing date to remove and save. To create a new time account, select the checkbox
  , include time model per week, type the start value hours and select validly from the date (year, month, and date) option. Then click on Save.
Vacation account
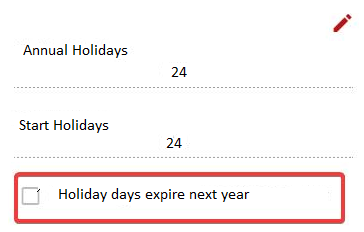
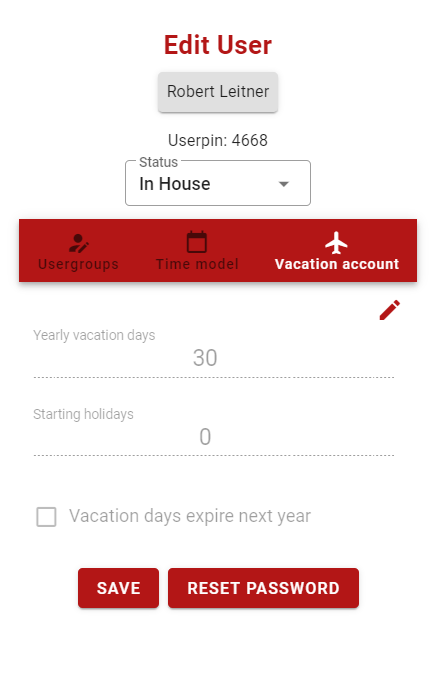 You click on the Vacation account tab of the Edit User window, then it displays the number of vacation days per year. When the vacation days expire the following year, tick the vacation days expire next year checkbox.
Delete
You want to remove a user account from the list, click on Delete button .
A Warning message appears to check whether your decision is correct or not. If it is correct, Click Ok.
Note: You cannot delete an employee from the system. COBI.time deletes and hides them. These can be reactivated using hide or show button ![]() from the user administration window.
from the user administration window.
If the employee has a running time account, it first closes the running time account and then deletes it.
Reset/Change Password
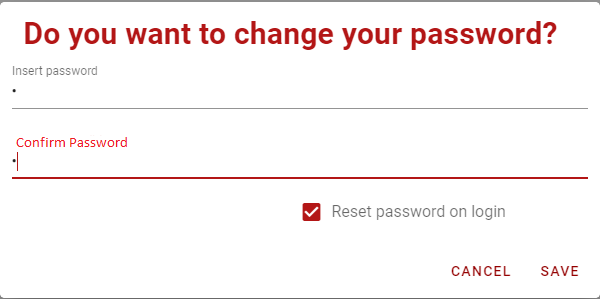
Users have an initially assigned password. By first time log in, users can change the password and give their own. You can reset or change the password to each user as required. To do this, select the relevant user and click on the Reset password button.
Insert the preferred password and confirm. Then click on Save.
General Setting
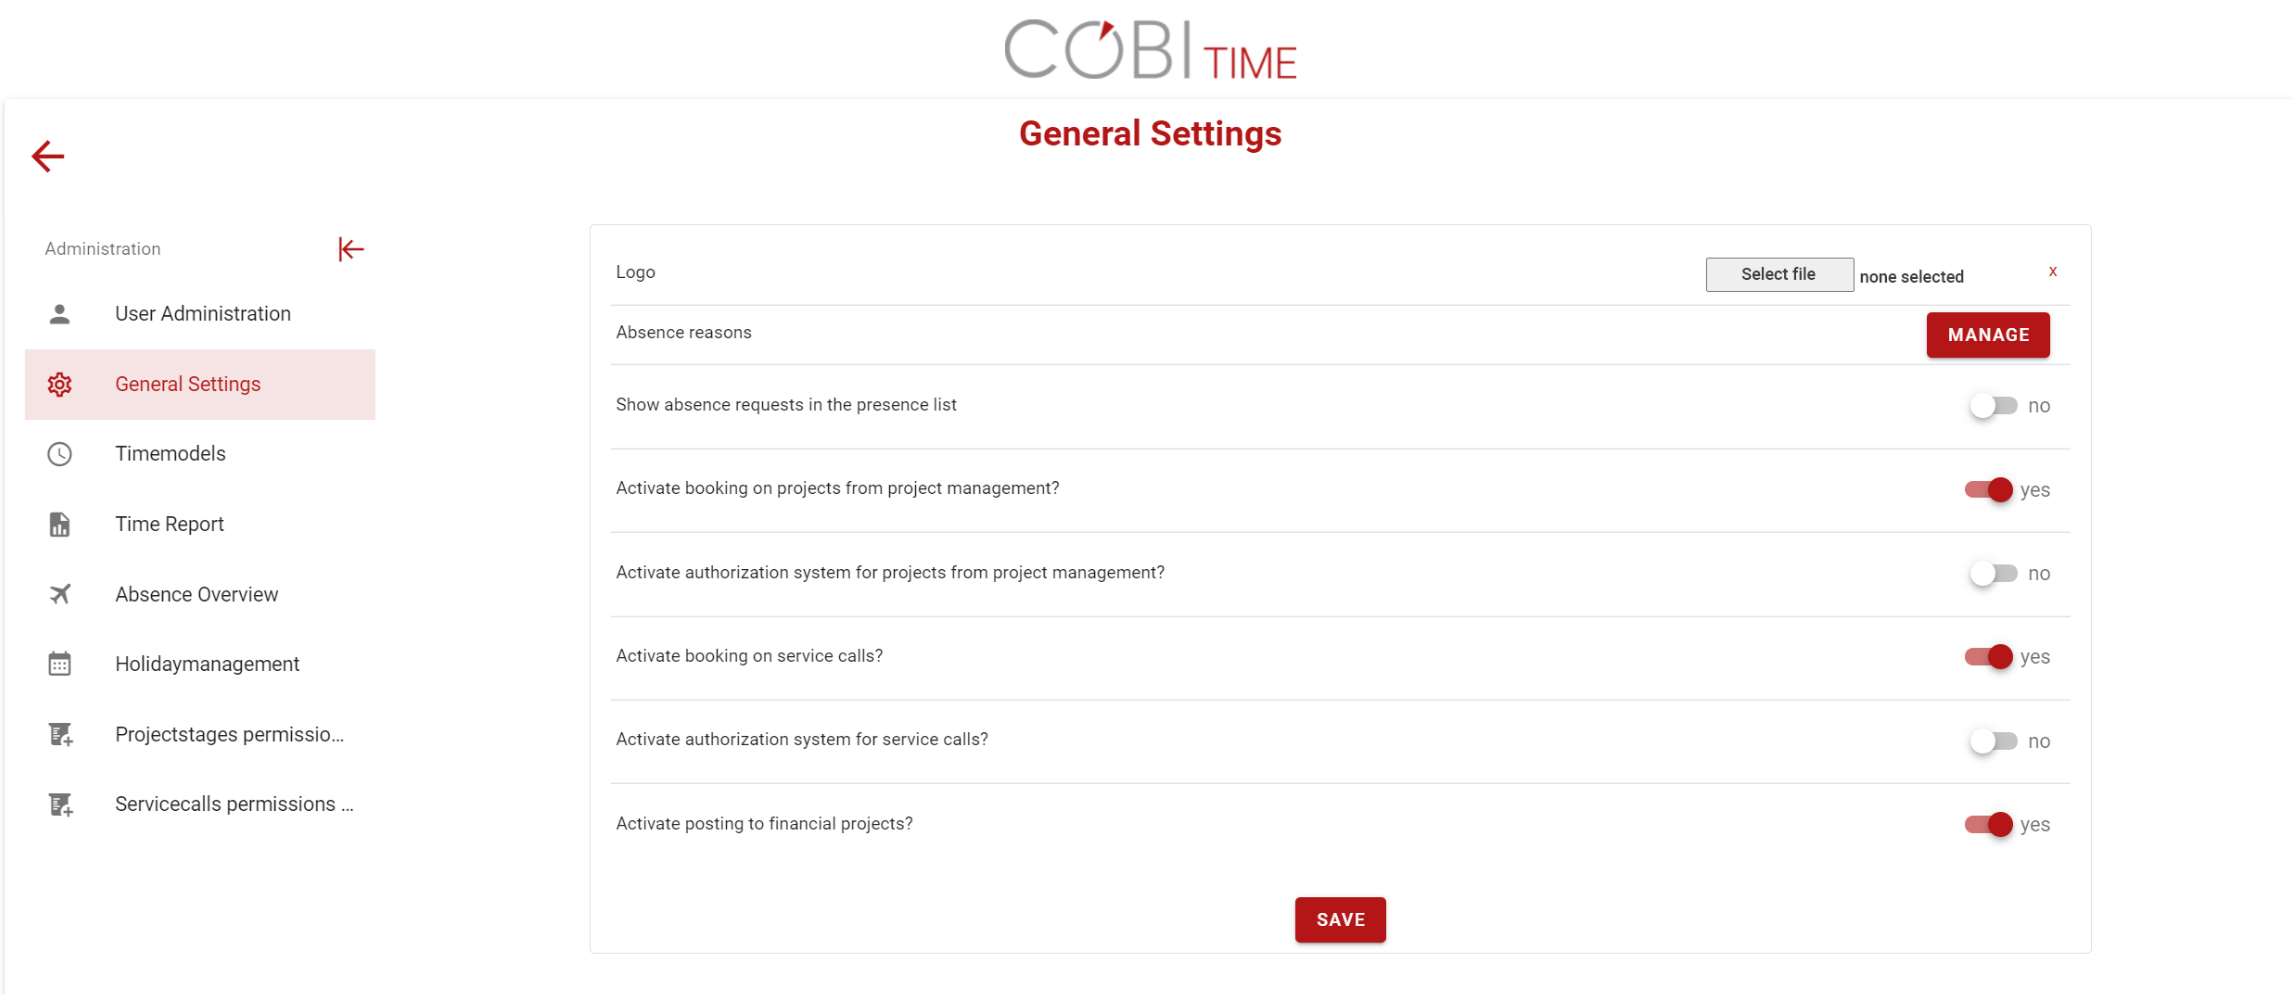
In order to work with the general setting, you need to click General settings from the main menu list.
Main Menu ⇒ Administration ⇒ General Settings
Then the following window displays:
In this section, you can change the logo by selecting the select file option . Then you can add a new Logo by uploading it.
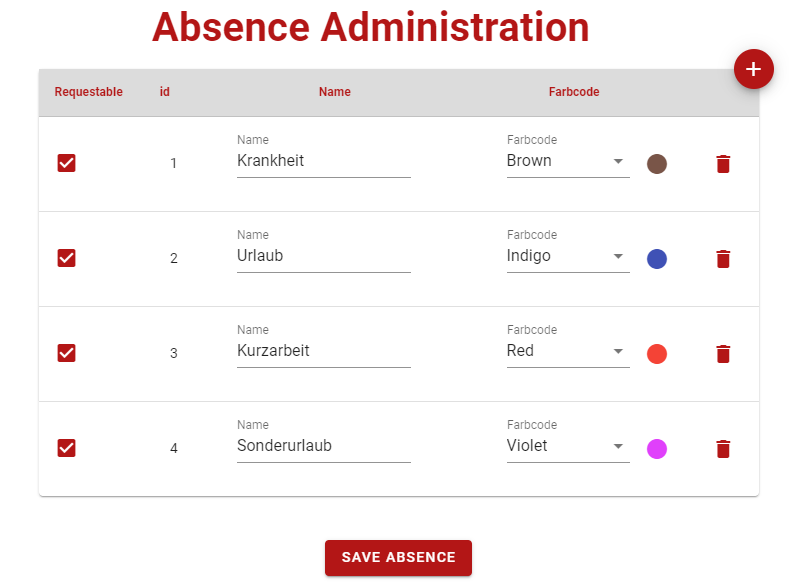
You can also manage Absence reasons by selecting the Manage button. Once you click on Manage, the window below displays. Then select which reason for absence to be in this context or add a new absence reason by clicking at the plus sign on the top right corner of the screen. Then click on Save Absence.
Activation /Deactivation
COBI.time offers activate/deactivate options to reorganize the product according to your company`s needs.
- Show absence requests in the presence list
- Activate booking on projects from project management
- Activate authorization system for projects from project management
- Activate booking on service calls
- Activate authorization system for service call
- Activate posting to financial projects
Time models
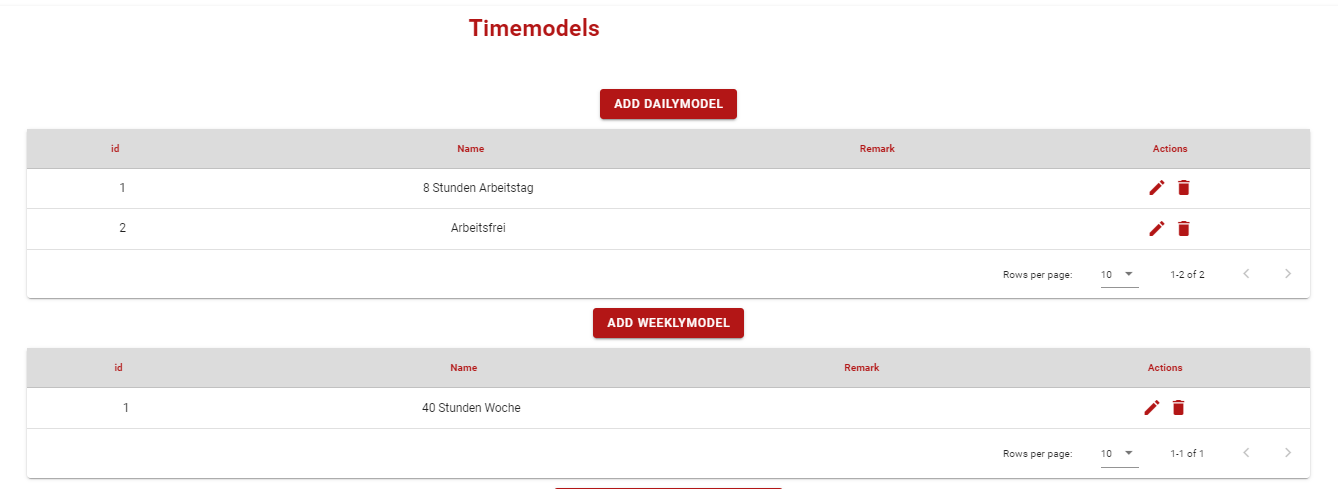
In the application, you can set the working time account according to your requirements. For instance, how do you want the daily time model or weekly time model to look like and displayed in.
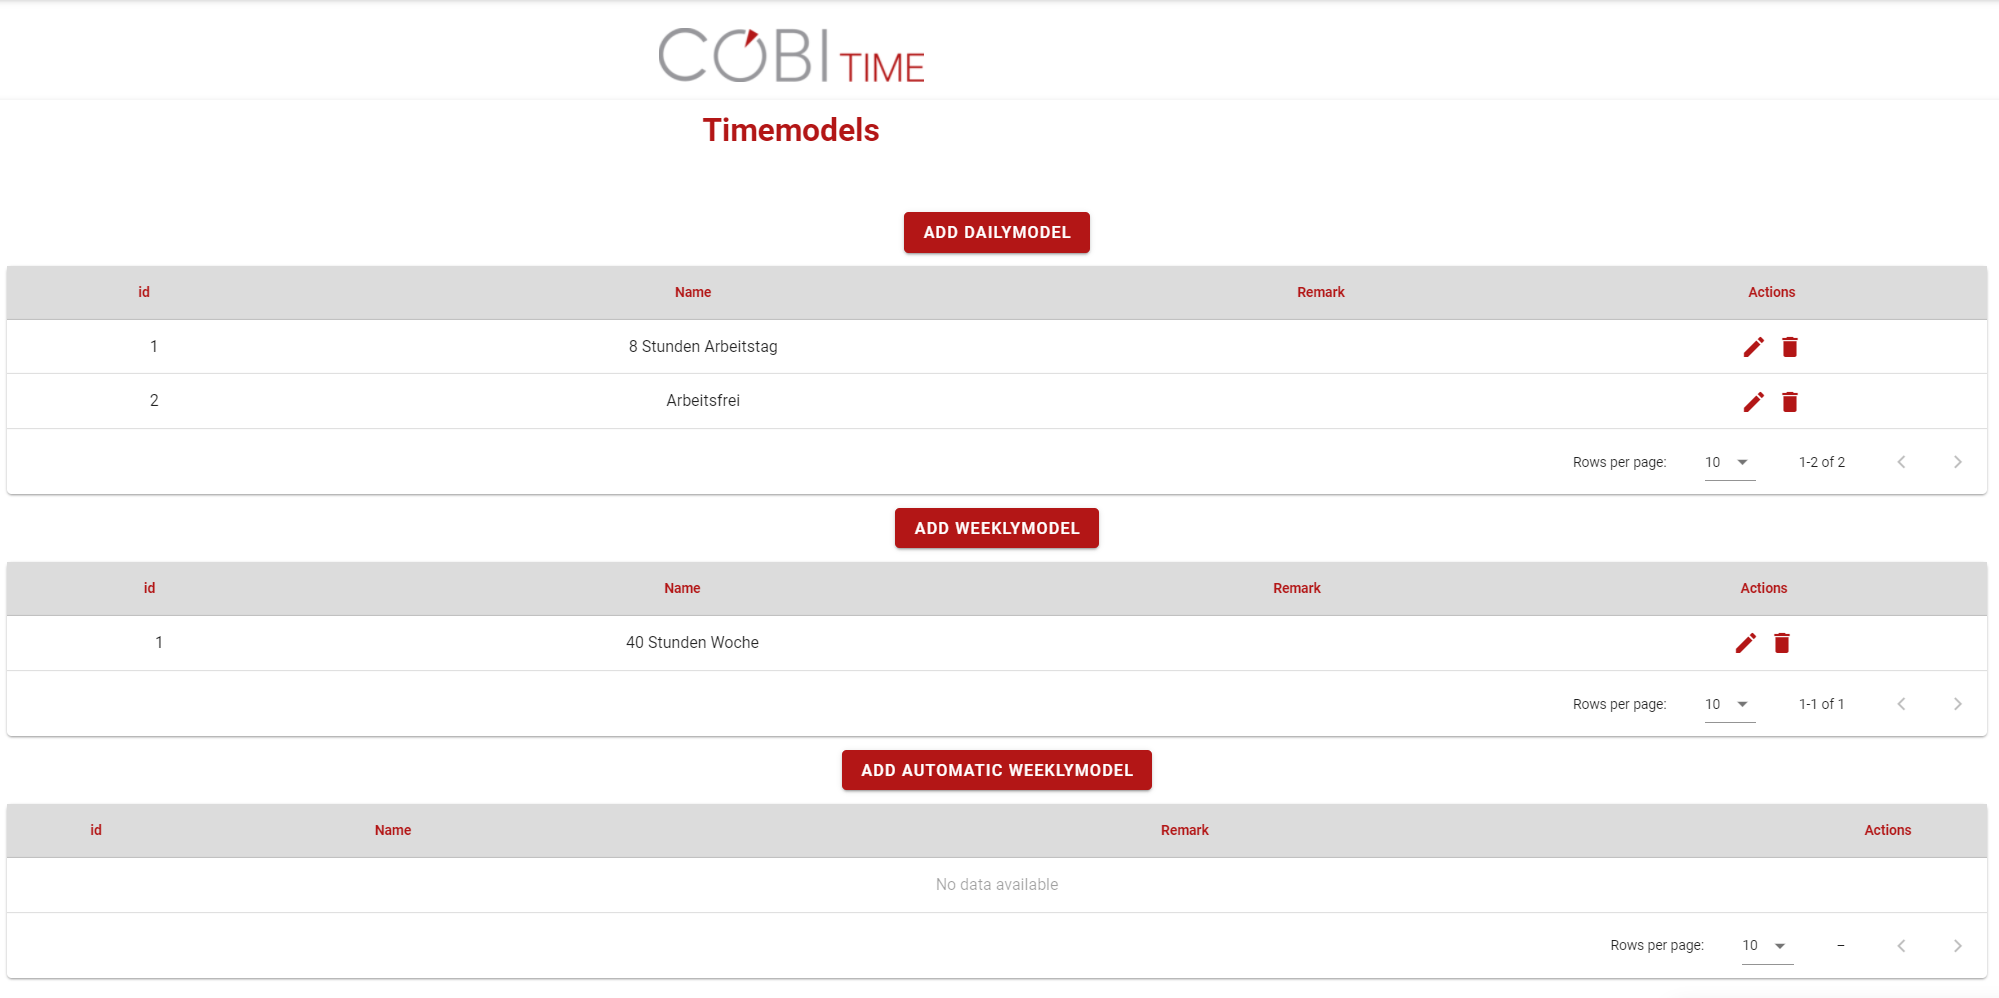
You can open the Time Models window from the main menu. To do this,
Main menu ⇒Administration⇒ Time Models
Setting Daily Time Model:
For a particular working day, you can add, edit or delete a Daily model name and the necessary information.
Add New Daily Model
Step 1: Add a new daily model:
Main Menu → Administration → Time models → Add Daily model
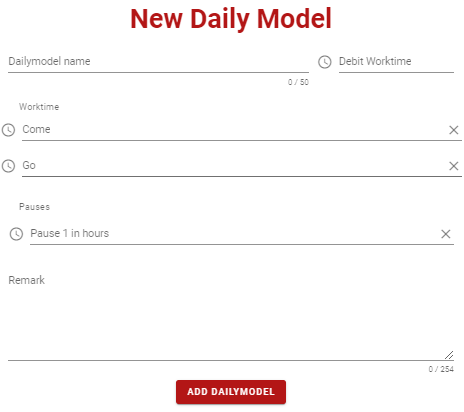
Step 2: Include the relevant data such as a daily model name, standard daily work time, start and end work time, Pause (break time) as well as comments in the displayed window.
Step 3: Click on Add Daily model button
Note: If no action is required and you want to cancel it, click outside the Time models window
Edit Daily Model
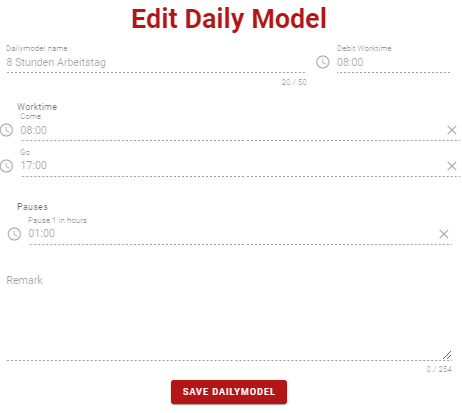
Editing the daily model of the existing records is applicable in COBI.time. To do this:
Step 1: click on the Edit button
Step 2: Take an action to make the necessary changes i.e. editing the data that requires any Change
Step 3: To save changes, click on Save Daily model
Delete Daily Model
Deleting the daily model is possible only if there is no active time account with a weekly model that is connected to this daily model. For those in active time account that requires deletion, use the Delete button to take the action of deletion. To do this:
Step 1: Click on the Delete button.
Step 2: Read the message carefully. If the decision is correct, click on OK to delete the record. If you are unsure about that click on Cancel.
Setting Weekly Time Model
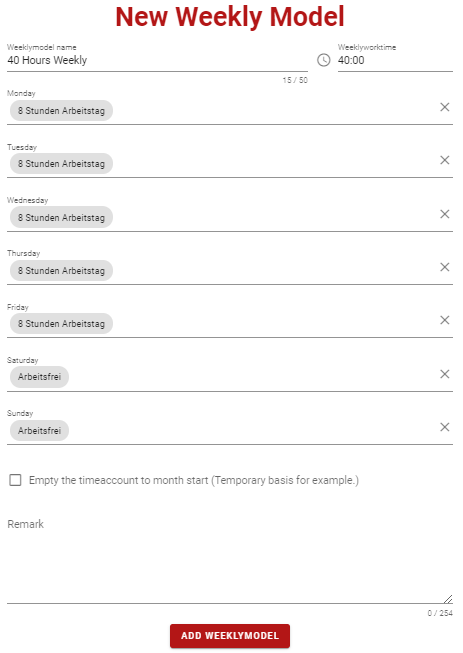
Similar to the daily time model setting, you can also add, edit or delete the weekly time model. The weekly time gets calculated automatically. This depends on every workday you selected in the daily models. However, when editing is required you should do this:
Add New Weekly model
Step 1: Main Menu → Administration → Time models → Add weekly model
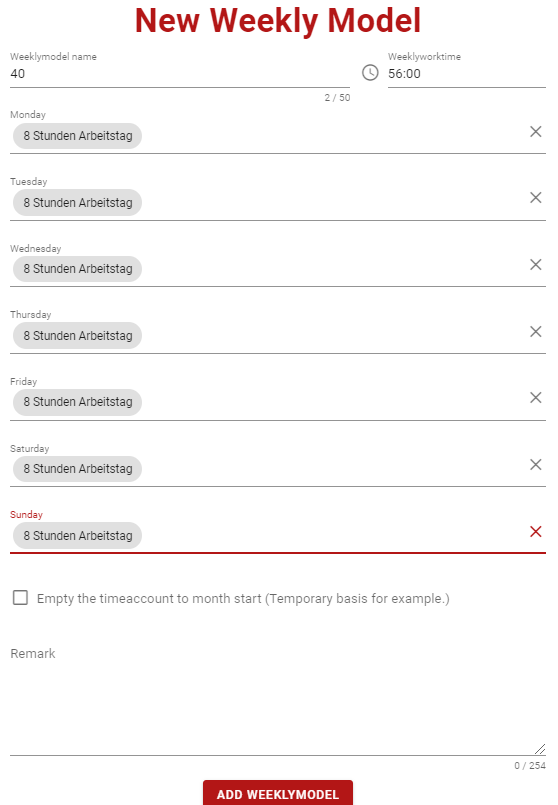
Step 2: Include the relevant data such as the weekly model name and weekly work time.
Step 3: For each day of the week, you can select the standard working time or any available
data from the list. It could be 8 hours of standard work times or free work time. You can also add remarks if deemed necessary.

Step 4: Click on Add weekly model button
Edit weekly model
Editing the weekly model of the existing records is also available in COBI.time. To do this:
Step 1: Main Menu → Administration → Time models → then click on the Edit button as shown below
Step 2: Take an action to make the necessary changes i.e., editing the data that requires any Change.
Step 3: To save changes, click Save weeklymodel
Automatic Weekly Model
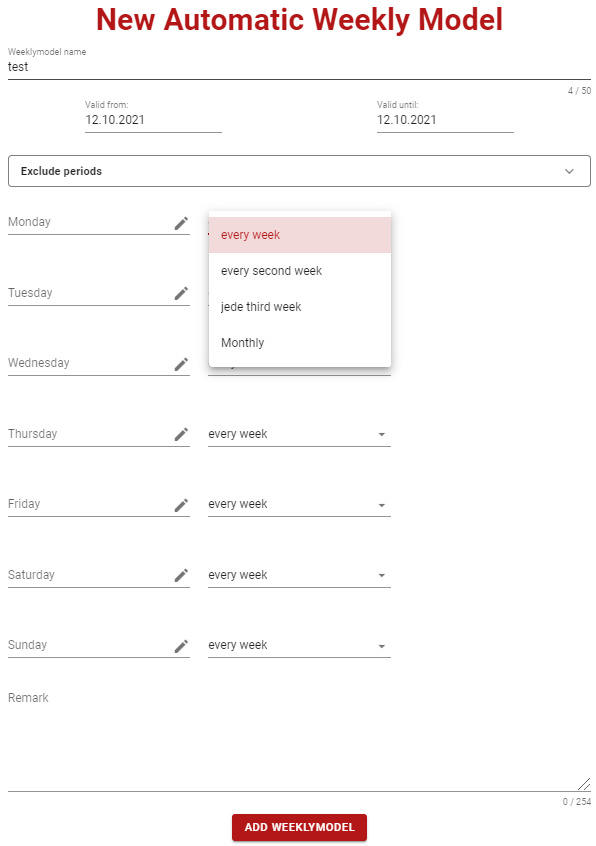
Automatic Weekly Model is mostly beneficial for companies that have trainees. Some days in the week they go to school and their school days are booked in COBI.time automatically. It is also possible to select the recurrence.
Step 1: Main Menu → Administration → Time models → Add Automatic Weekly Model
Step 2: Insert the Weekly Model Name and the time interval.
Step 3: Select the day and recurrence for automatic booking
Delete weekly model
Deleting weekly model is possible only if there is no active time account with that weekly model. If deemed necessary therefore, the action will be taken using the Delete button. To do this:
Step 1: Click on the Delete button.
Step 2: Read the message carefully. If you are sure that you are making the correct decision, click OK and the record will be deleted. If you are unsure about that, click Cancel.
Time Report
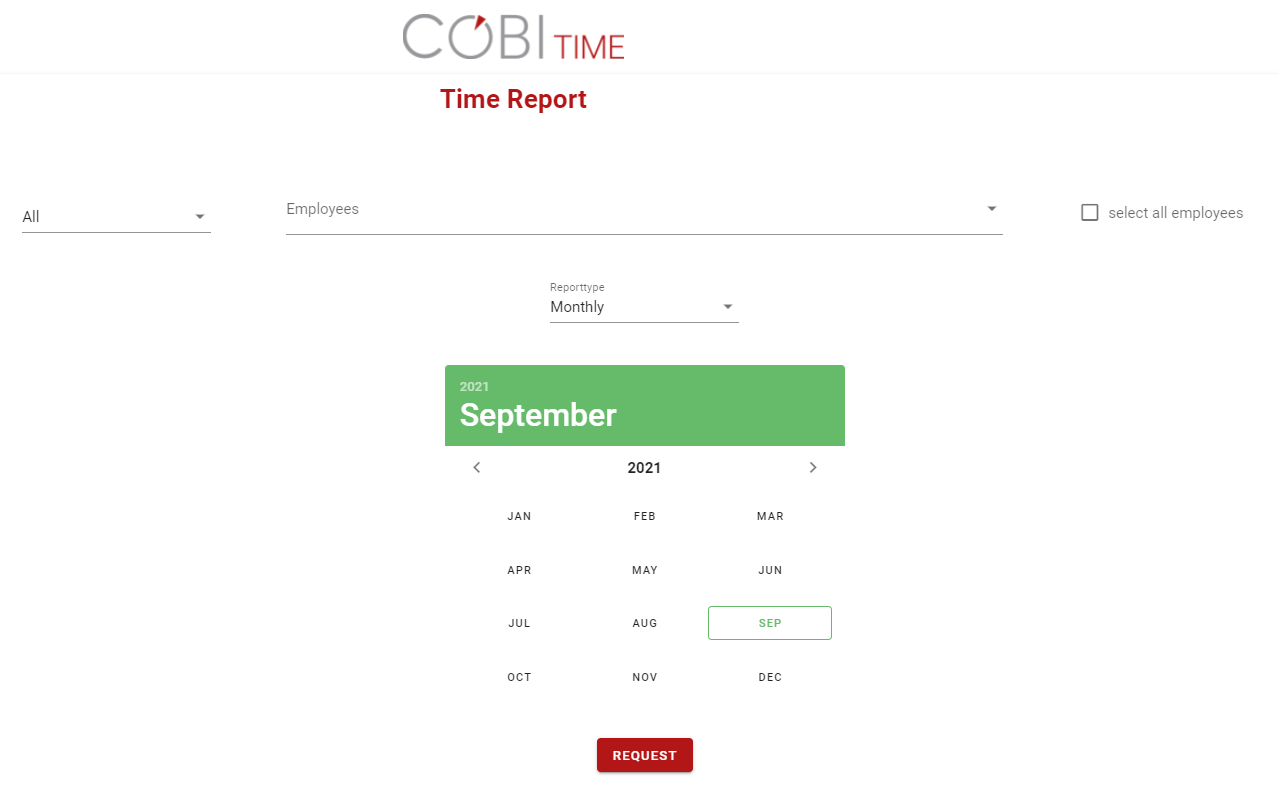
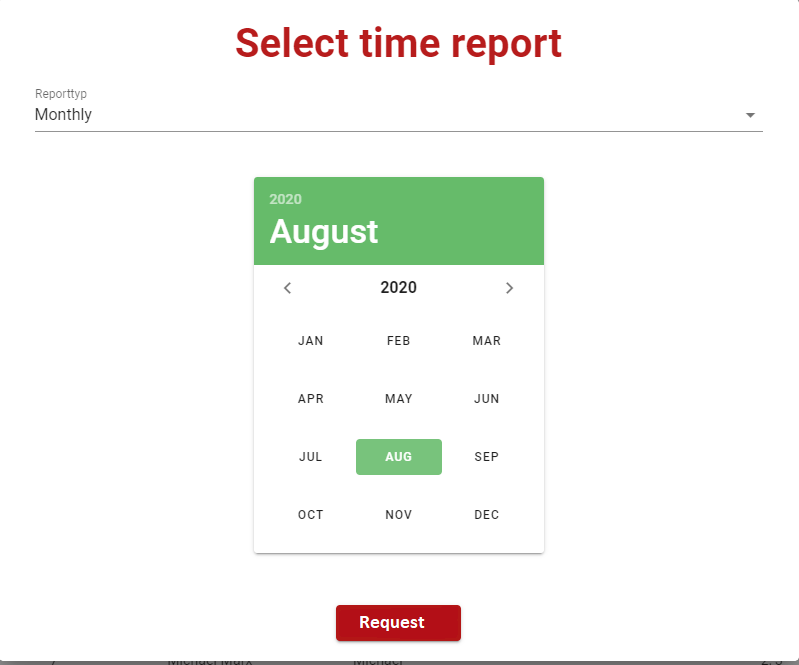
In this section, you also have an option to view the time report for a particular period of preference. To open the select time report window, click on the Time report button of the Administration menu.
Main Menu → Administration → Time Report
Then it displays:
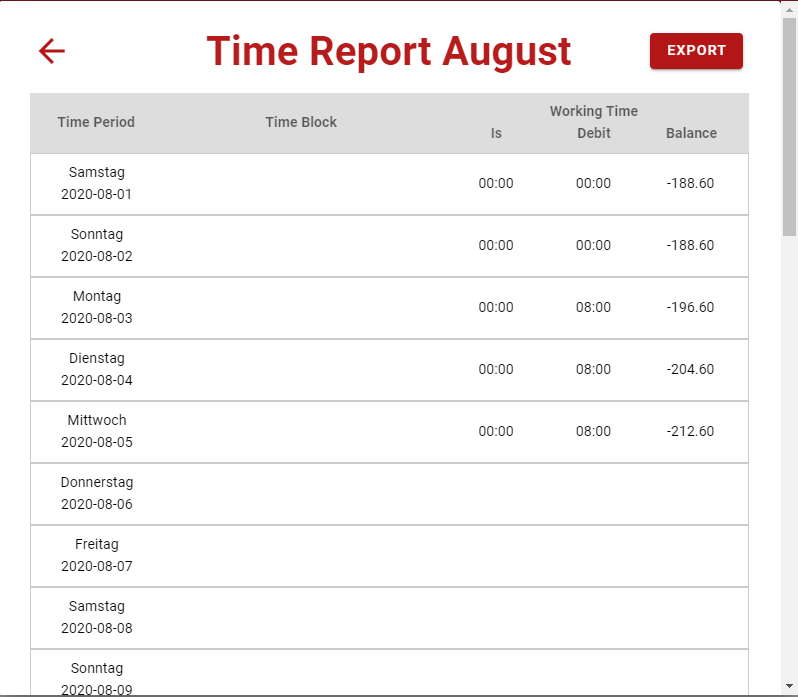
Select the relevant user, year, and month for which the report is going to be requested. Then click on Request. Finally, you will get the requested period report displayed as:
You can produce an Excel file of this report by clicking at the Export tab on the top right corner of the opened window.
Holiday Management
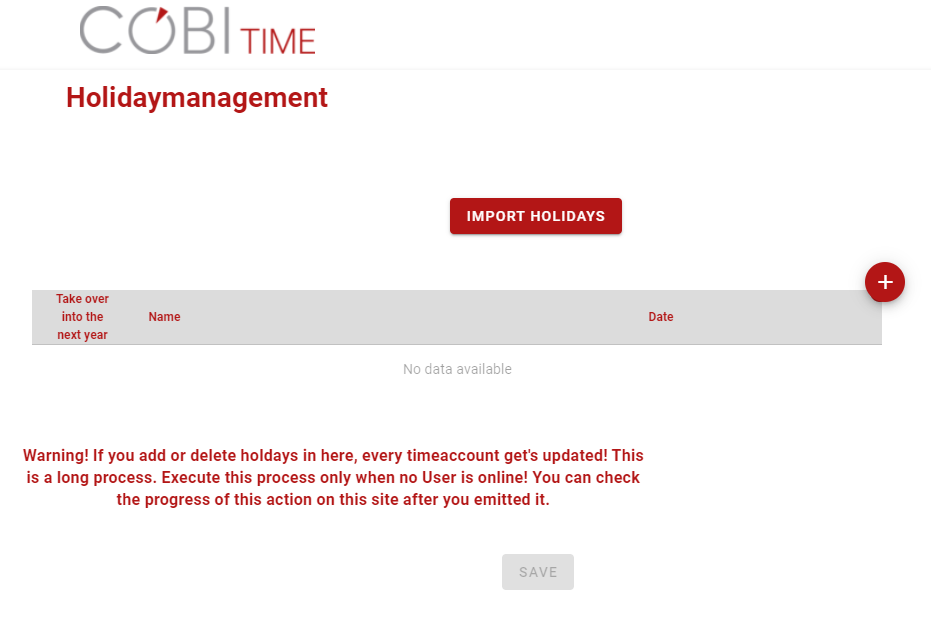
Holiday management is also another available option in COBI.time. You open the Holiday Management window from the main menu as Administration → Holiday Management.
Notice:
In this section, it is important to notice that ever Time-account gets updated when action on adding or deleting holidays is carried out. Therefore, you have to make sure that no User is online in order to execute the process.
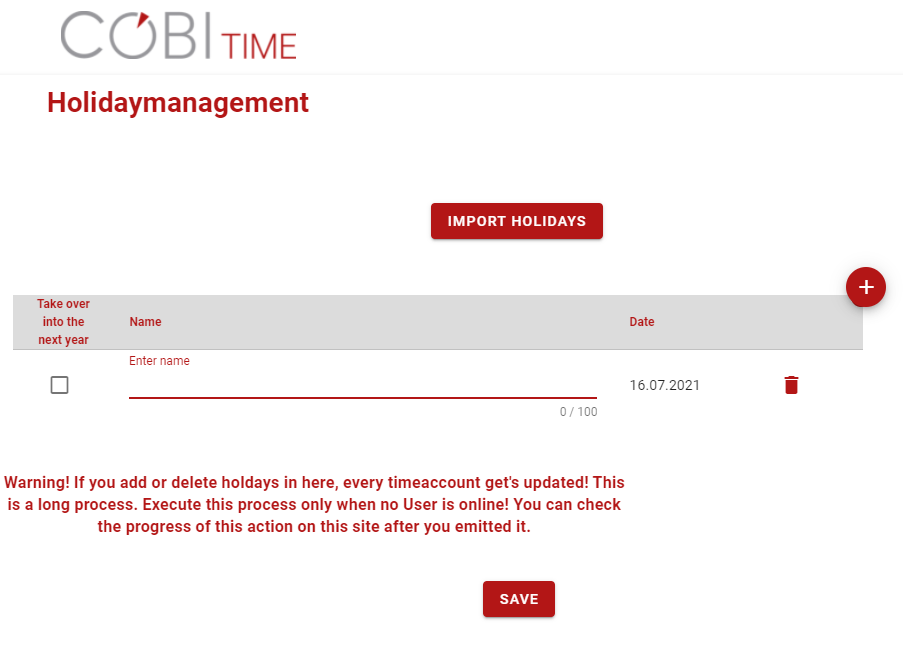
You can create a new holiday by clicking on the plus sign . Include the name and click on save. Click on the Tickbox if there is a need to take over the holiday name into the next year.
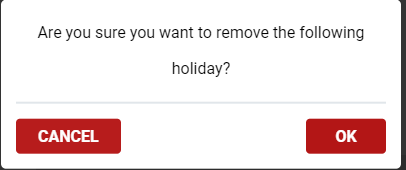
If the holiday name is no more needed, you can remove it by clicking on the Trash button
Click ok to confirm the deletion process. If no action is required, click on Cancel.
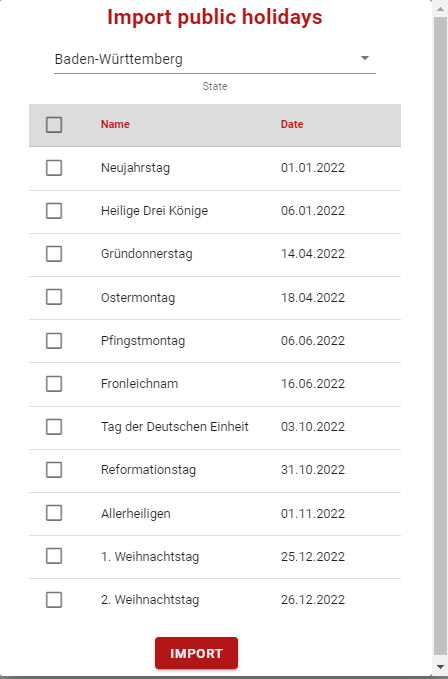
You can also the import Holidays using Import Holidays button  . The window on the left displays. Then select from the given list and click on the Import button to execute the process.
Note that the yearly holidays depend and created based on the employment starting date.
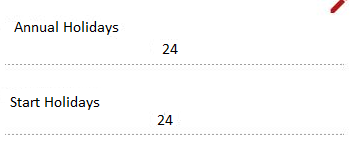
In this case, the annual holidays are the number of holiday days an employee gets and assuming that the starting date was January and full holiday days are considered for the current year
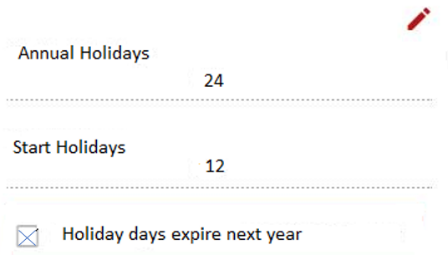
Assuming a new employee started in the middle of the year (e.g. in the month of June), the holiday days for the year are calculated pro rata. If these are e.g. 24 days (normally the leave is based on the contract), the employee has only 12 days of leave left for the current year. In the following year, the employee then receives the annual leave plus the remaining leave days (only if the option “Leave days expire next year” is ticked).
Then the display will be as
Project Stages Permissions and Assignments
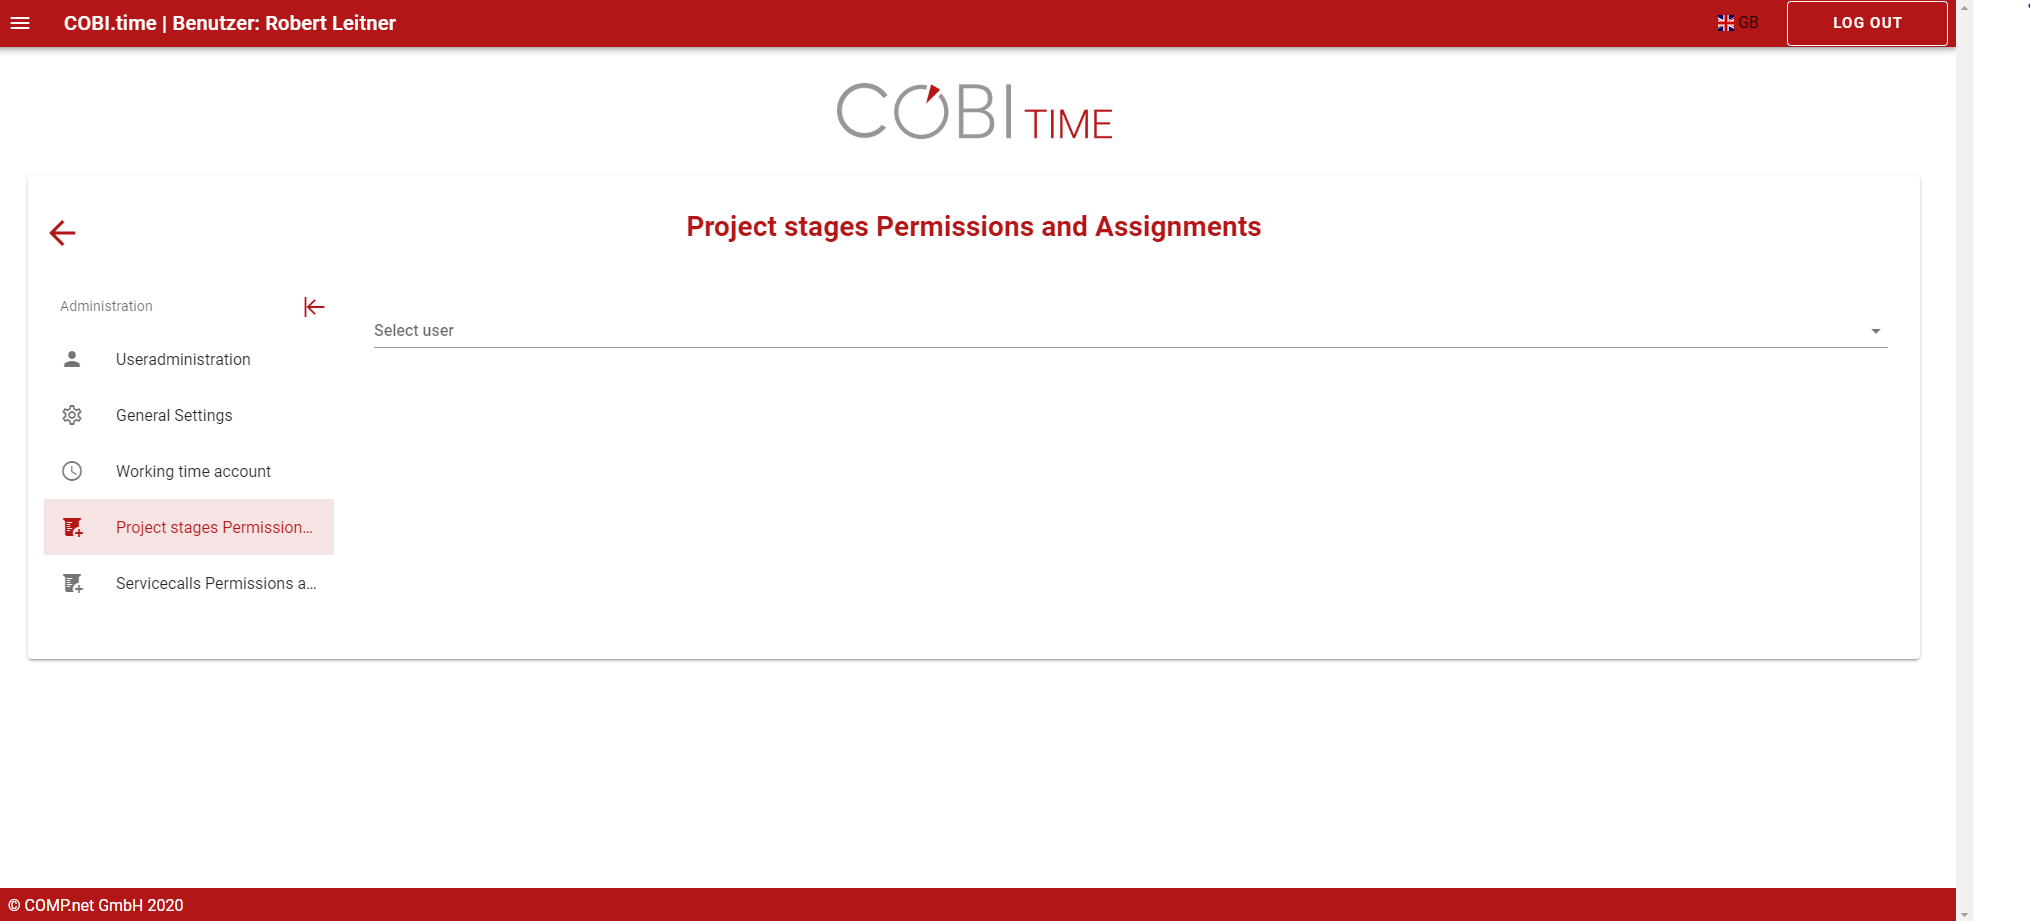
The project stages permissions and assignments section of COBI.time provides an option for you to record the work time for a particular project related to business partners. To select users for action in the project stages permissions and assignments, do this:
Step 1: Main Menu → Administration → Project Stages permissions and assignments → select user
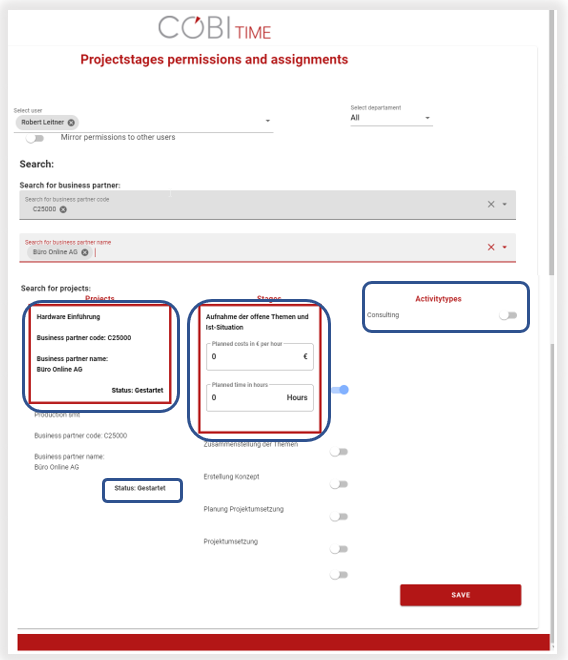
Step 2: Once the user is selected, you can provide relevant information related to Business partners, project type, Activities types, planned cost per stage, planned time per stage, or status.
Step 3: Click on Save
Mirror Permissions
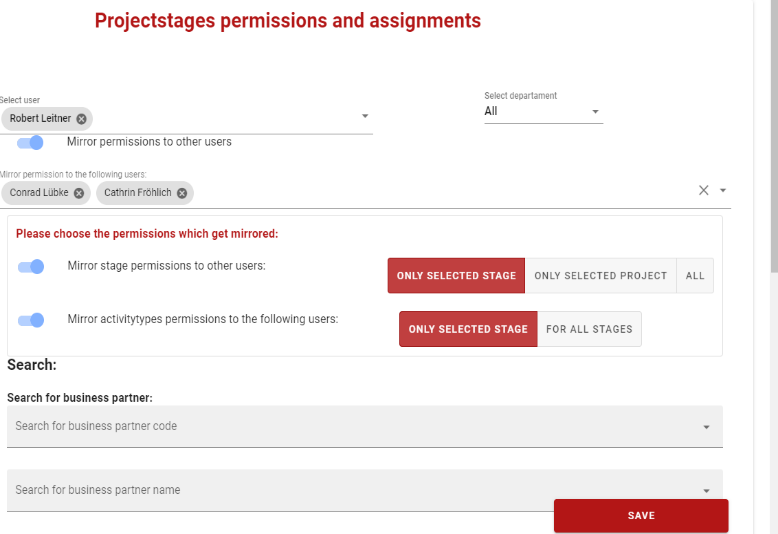
In this area it is also possible to give permissions to other users at the same time. For example, several users can be given permissions for a project that Robert Leitner has in progress. Click on the option Grant permissions to other users and then select the desired users from the drop-down list. You then have the option to select the appropriate permissions, e.g. levels or activity types, etc. Then save the action.
==== Service Calls Permissions and Assignments ====
In this section, you can display and work with the service calls permissions and assignments related to each user. The process displays information about the business partner, service calls and activities. To do this:
Step 1: Main Menu → Administration → Service Calls Permissions and Assignments →select user
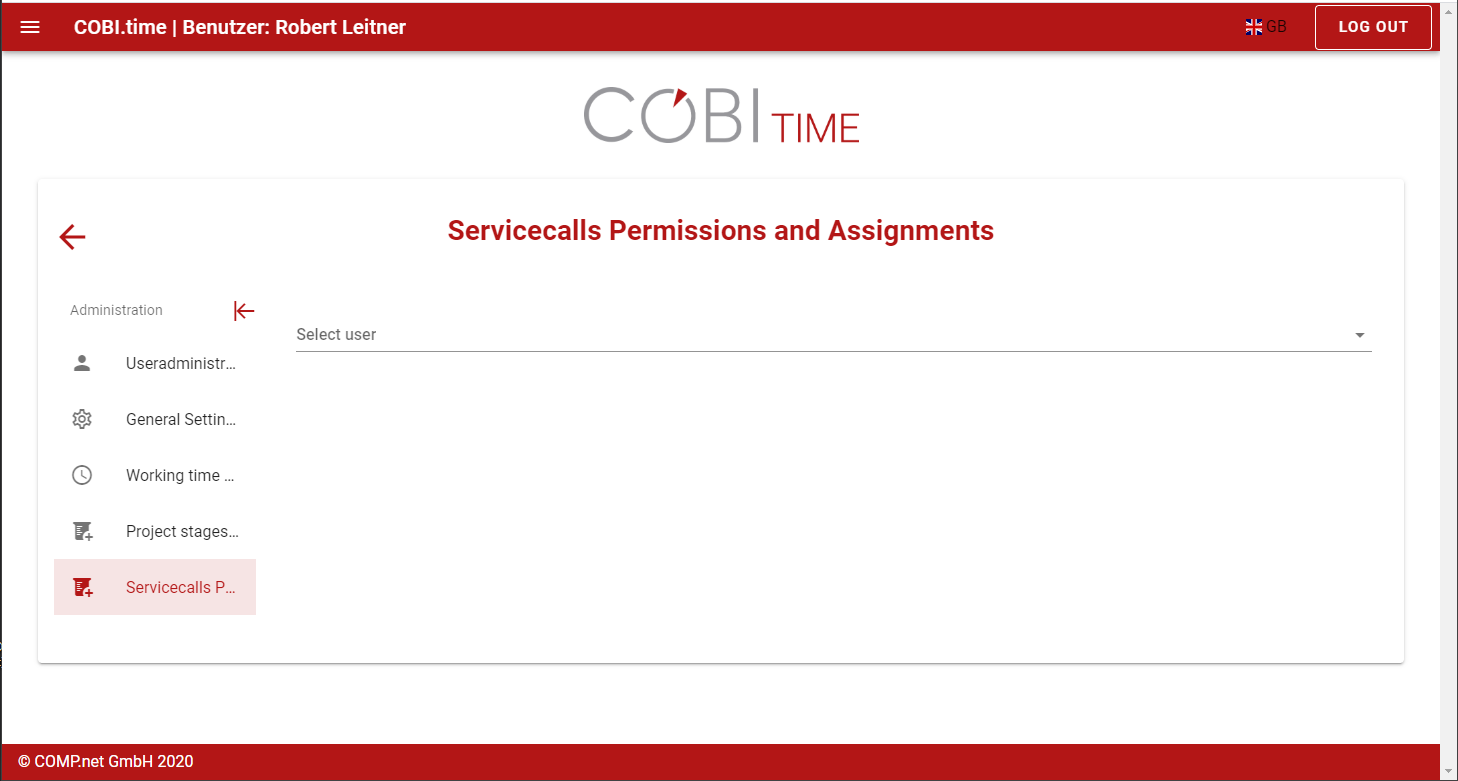 Step 2: Once you identify the user from the list, you can have the following information displayed:
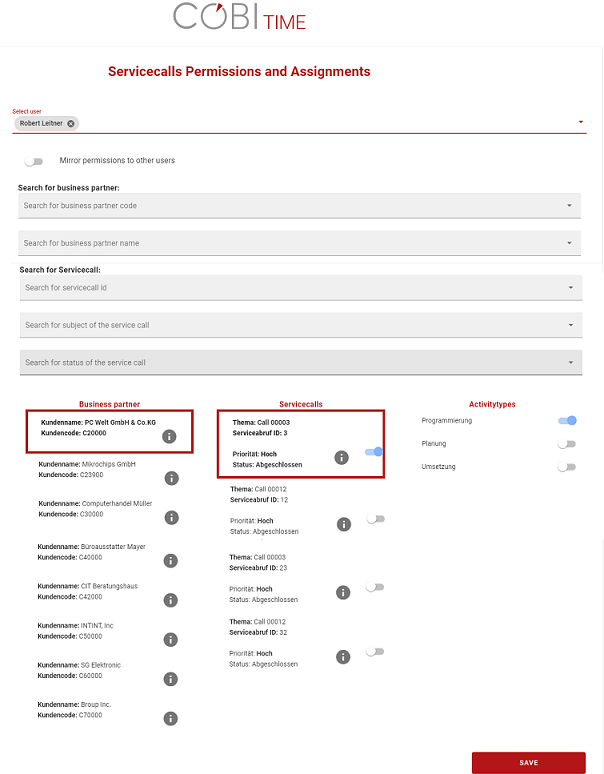 Step 3: To save changes, click Save
===== Attendance list =====
==== Status Show and Change Mode of Attendance List ====
The status of the presence list of employees is available for display in COBI.time. To do this:
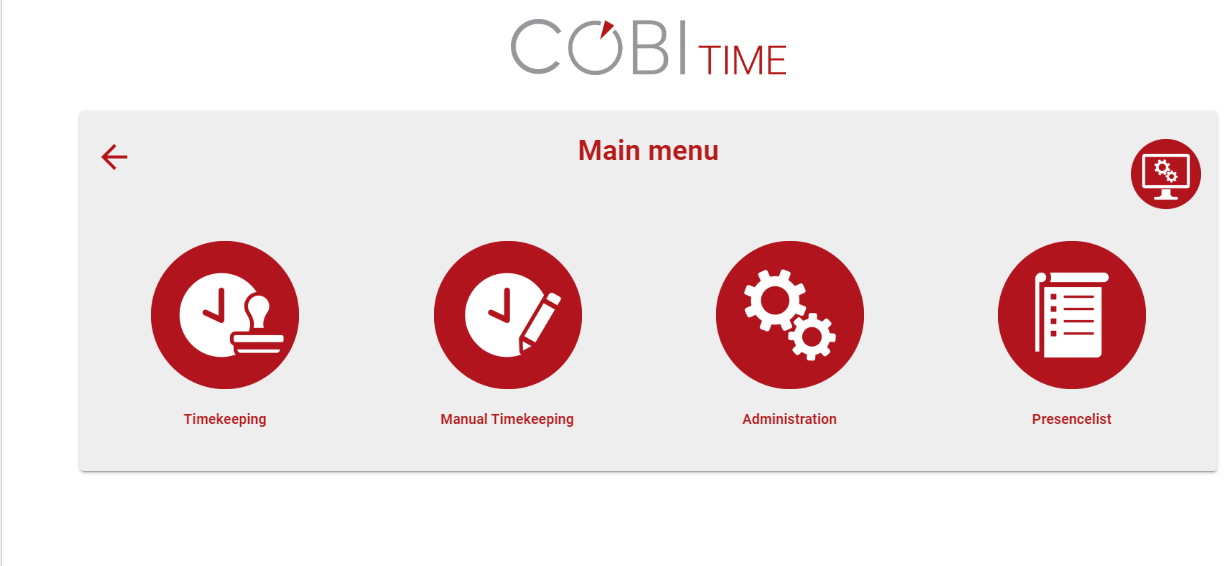
Step 1: Main Menu à Presence List or by clicking on the Presencelist Icon as displayed
below:
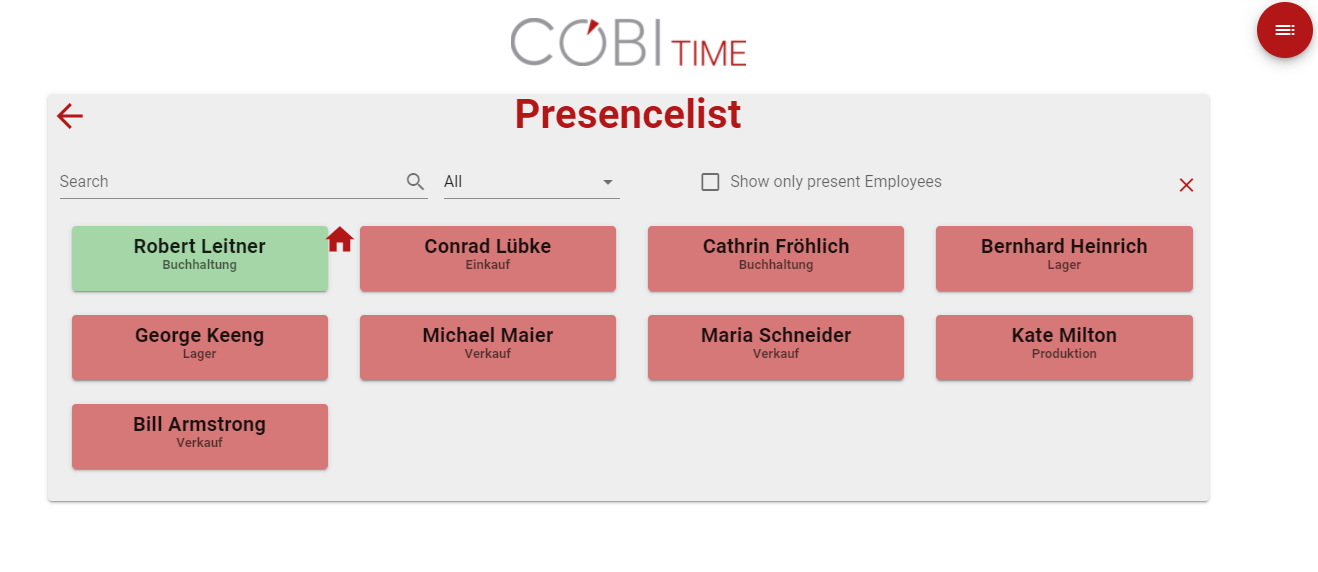
 Step 2: Select the relevant search options for the display. Type a user or department name in the search field to find the required list. You can select the option All to display all available lists or select a specific department from the drop-down list to display what belongs to that particular department. If you want to see only those employees who are present, tick on the checkbox that stands for Show only present Employees.
The following displayed screen is in card mode.
 Legend
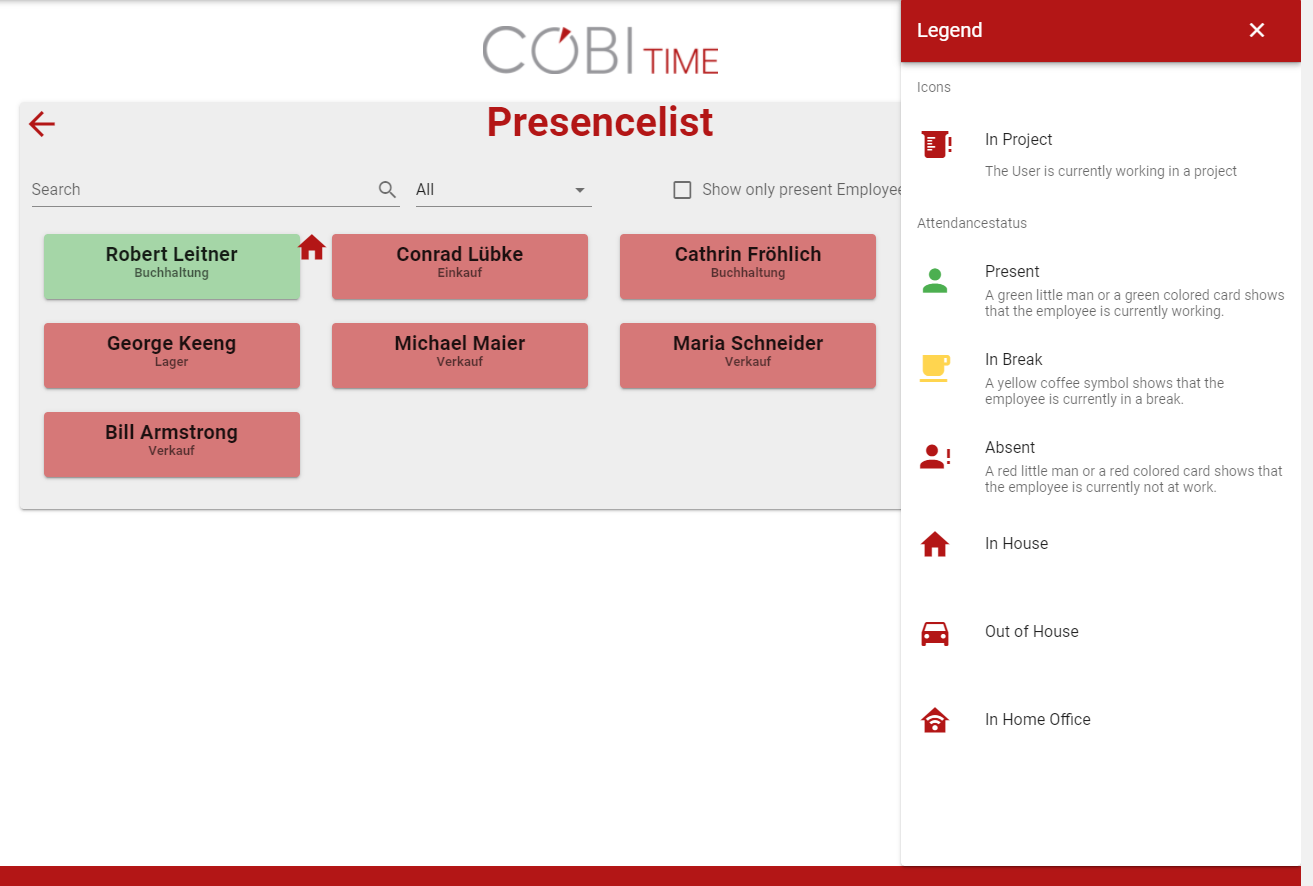
You can see the legend type for each status of the attendance icon such as in project,
present, in a break, in-home office, in house, out of the house, and absent. Each of these is represented with an individual icon. To do this:
Click on the Show Legend button on the top right corner of the Presencelist screen
 ==== Password Settings ====
In this section, you can set your password as you wish. You can reset, activate, or deactivate your password. To do this:
Main Menu → Password Setting
Then the following window displayed:
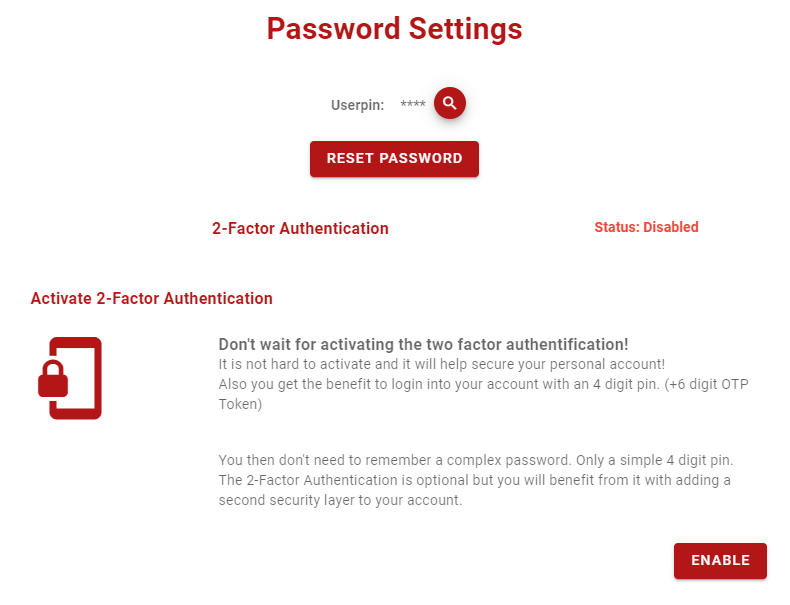
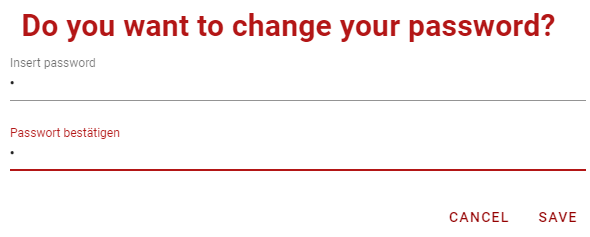 In order to reset/change the password, click on the Reset Password button. Then asking you to confirm.
Insert the preferred password and confirm. Then click on Save.
Look at the status of the 2-Factor Authentication. You can enable or disable this status by clicking at the Enable or Disable button at the bottom right of the Password Settings window.
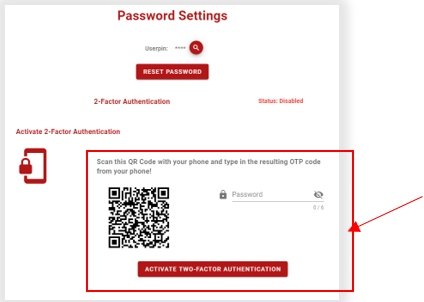
To enable the authentication, click on Enable button. You will be asked to activate 2-Factor Authentication.
To do this:
- Scan the QRCode with your mobile phone
- Get an OTP code
- Insert the OTP Code in the Password field
- Click on Activate 2-Factor Authentication
 Then the status is enabled as displayed below:
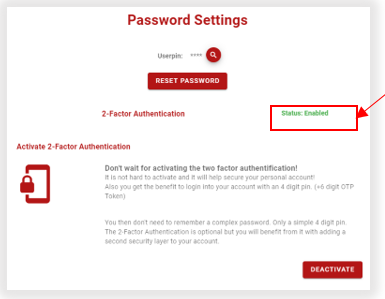 Deactivating 2-Factor Authentication is simply click on Deactivate Button, then it will automatically be changed to Disabled status.
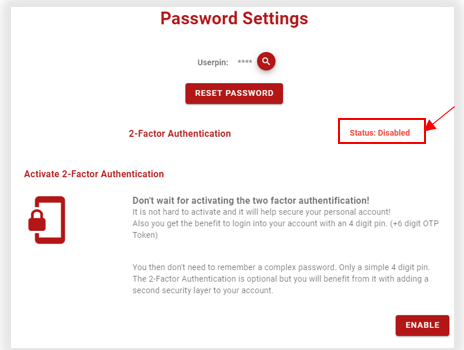
The reason for this function is that you can log into COBI.time from the local network using the 4-digit pin function. However, this is insecure if COBI.time is accessible via the Internet. Therefore, it is necessary to implement 2-factor authentication to enable logging in with a 4-digit pin code and make access more secure. So you need the 6-digit temporary token plus the 4-digit pin code to log in.
Note:
Absence request is already covered in section
====== Reporting Procedures ======
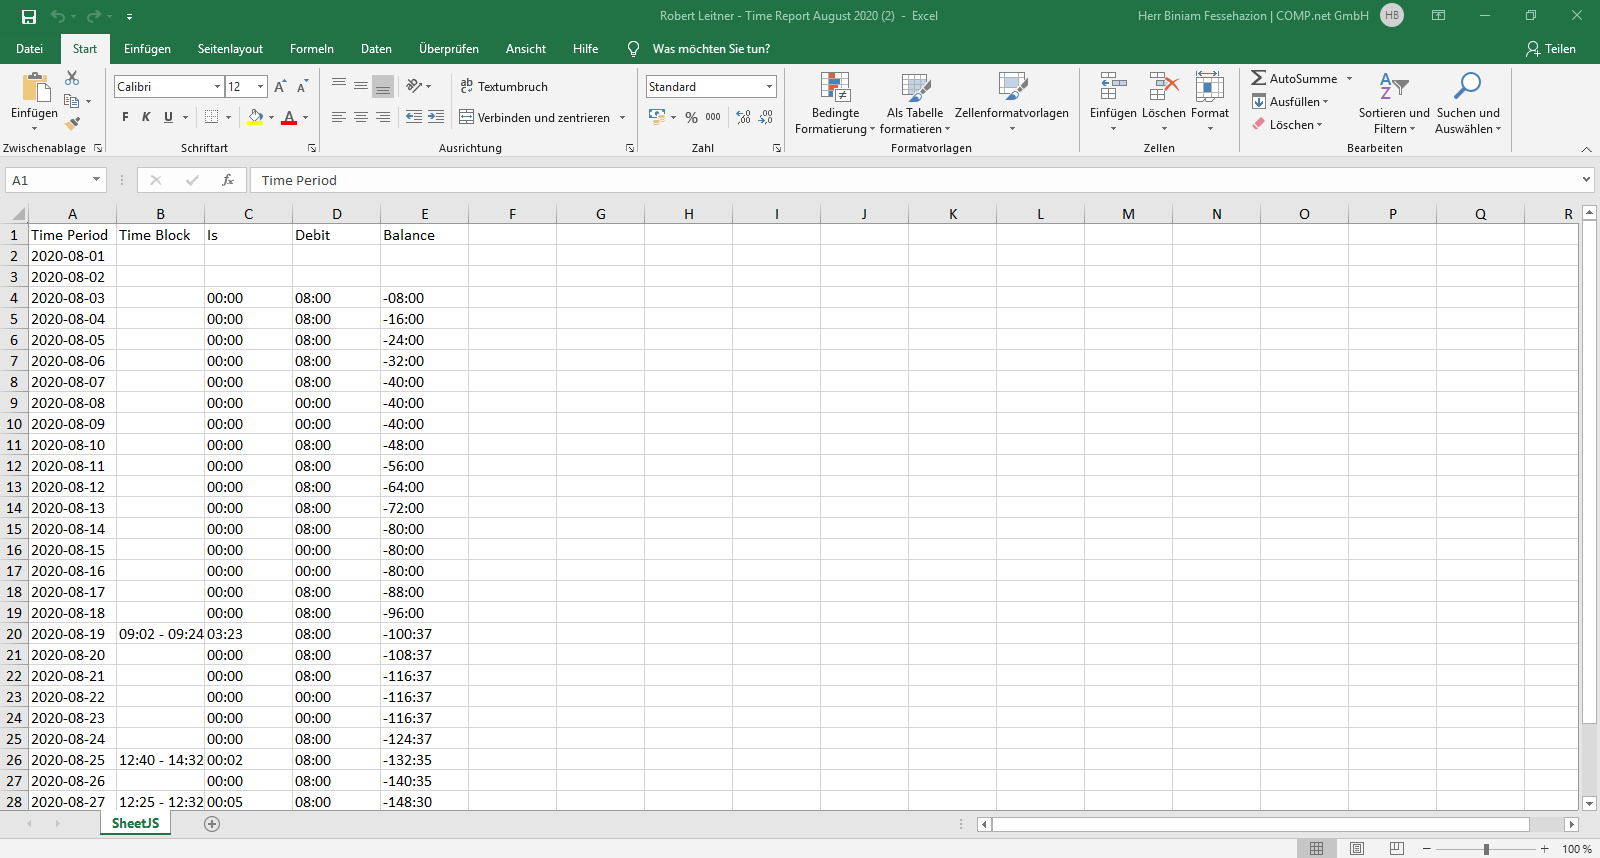
The report can be available at several stages where a monthly time report is required for a relevant year on selection. The the report can be exported into an Excel file. You can also view the attendance list as one report for all employees or a particular group as you wish. This has been explained based on their relevance in the previous sections. Here below as an example of a time report.
The procedure is:
Step 1: Main Menu → Administration → Time report button
 Step 2: Select the relevant year and month for which the report is going to be requested.
 Step 3: Click on Request to display the time report
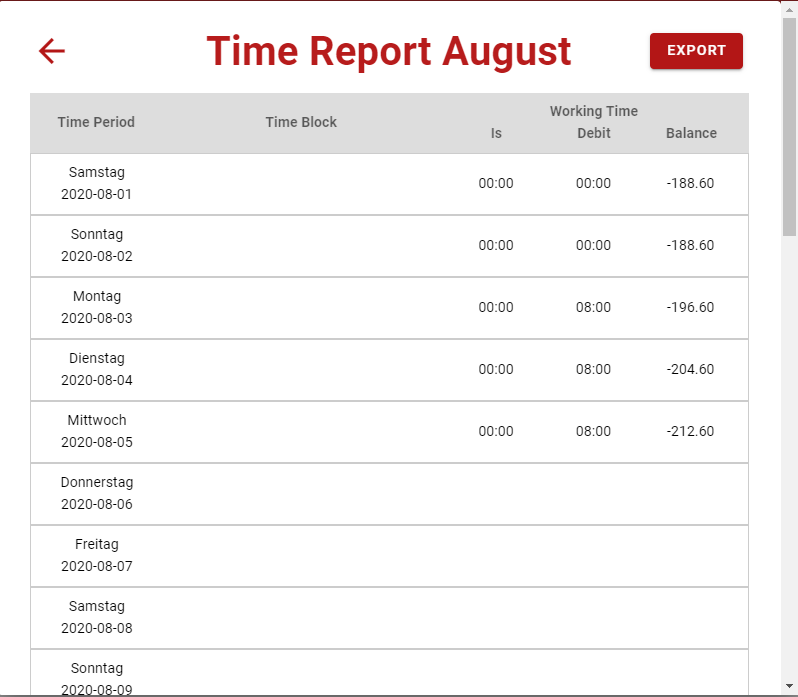 Step 4**: Exporting the report will produce an Excel file for you. To take this action, click on
Export tab.
Summary
COBI.time is an efficient personnel time recording in SAP Business One for modern medium-sized companies. It is a contemporary solution that meets all the requirements of modern working time recording anywhere and at any time.
Working with employee time records offers great advantages and simplifies the administration process considerably. You can see attendance status and mail notifications at a glance as soon as you open the main COBI.time window. Applying time recording by work category is also possible in COBI.time. The history of the recorded data in the form of daily or monthly time records can also be displayed.
Whenever you need and want to process detailed information on employees' time records, you can use manual time recording flexibly.
COBI.time allows administrators to manage individual users and configure a number of settings for each user account according to their authorisations and responsibilities. For example, importing SAP users, editing users (user group identifier, time model and leave account), deleting a user, resetting password, time report, absence overview are available in this area.
In the general settings section of COBI.time, it is possible to insert a new logo, change the existing logo or set the default logo again. You can also manage the details of the reasons for absence in the general settings window. Working with working time accounts is also possible. In the application, you can easily set up a working time account according to your wishes and operational requirements. Here, for example, you define how the daily time model or weekly time model should exist in the system.
Working time recording for a specific project in relation to business partners is also done within the project phases Authorisations and Assignments in COBI.time. Working with the authorisations and assignments for service calls related to each user, with the relevant information about the business partner, service calls and activities, is done in the Authorisations and Assignments for Service Calls section on the User Management tab.
Finally, the status display and change mode of the attendance list as well as the absence request functions of COBI.time are also available. In addition, the functionality of 2-factor authentication is implemented and covered in COBI.time.
COBI.time thus has a strong functionality for reliable and efficient time recording of employees in the administrative processes of a company.
