
This is an old revision of the document!
COBI.time - User Manual for the Standard User
Table of Contents
Purpose and area of application
The following information is intended to provide the standard user with all the necessary information for using this software in the time recording management process. It supports the user in using COBI.time to record his working times, which are then integrated into SAP Business One.
The documentation is divided into the following sections
- General settings:
- Device configuration
- Language settings
- View
- Profile Picture
- Employee time recording:
- Dashboard
- Menu bar
- Digital time clock
- Attendance list
- Notifications
- Monthly Overview
General Settings
Device configuration
If you enter the domain name with /start, the configuration mask of COBI.time is displayed.
Example: https://cobitime-url/start
You have the option here of choosing the way you want to log in.
Select the desired configuration and click on Save.

The username is generally taken from SAP Business One. If no SAP user code is defined, a username can be assigned manually by the administrator before the import from SAP Business One.
When importing employees from SAP into COBI.time, the administrator assigns a unique start password for all employees. When trying to log in for the first time, employees are requested to change the password accordingly.

The PIN is generated automatically during import and can be requested from the administrator.
RFID chips can be activated and made available by the administrator.
If the “Terminal mode” checkbox is ticked, the system automatically returns to the login screen after 15 seconds (default). The time can be adjusted accordingly. Terminal mode is useful if, for example, several users (production, warehouse, etc.) have to log in on one tablet.
If COBI.time is used in the terminal, the employee is only shown the digital time clock when logging in and not the complete dashboard.


If the checkbox “Terminal Mode” is activated, the system automatically returns to the login screen after 15 seconds (default). The time can be adjusted as needed. The terminal mode is useful, for example, when multiple users (e.g., from production or warehouse) need to log in on the same tablet.
Language settings
You also have the option of selecting your preferred language to work with.
This function can be found in the top right-hand corner. COBI.time is available in both German, English and France.

Display View
COBI.time can be operated in both dark and light mode. The slider for changing the view can also be found in the top right-hand corner, to the left of the language selection.

Insert profile picture
To add or change a profile picture, click on the image area at the top of the menu bar and upload the chosen picture.

Employees Time Recording
Dashboard
After all general settings have been selected, you can now log in to COBI.time as an authorised employee and receive the following dashboard.

The dashboard is divided into 5 areas. See points 1 - 5 below in relation to the illustration above.
1. Menu Bar

By clicking on the “Time tracking” icon, the complete dashboard is displayed.
Daily History

By clicking the Daily History button, an overlay window opens displaying the employee's bookings for a specific day.

The following information is available:
- Clock-in and clock-out times
- Recorded activities
- Working time
- Break time
- Daily time account balance
The arrow buttons can be used to navigate between individual days. This view provides a detailed overview of all time bookings and calculations for the selected date.
Monthly History

By clicking the Monthly History button, an overlay window opens displaying the employee's monthly calendar.

Each day displays the recorded work time and break time. The arrow buttons can be used to navigate between months. This view allows employees to quickly review their attendance history and identify missing or incorrect bookings. At the bottom of the screen, the current time account balance is displayed.
My Time Report

By clicking the My Time Report button, a detailed report of the employee's time records is displayed.

The report contains detailed information such as:
- Working time
- Activity time
- Absence time
- Business trip time
- Doctor visit time
- Work errand time
- Required working time
- Break time
- Daily and cumulative balances
The report can also be exported for further processing and documentation purposes. This view provides a complete overview of all recorded and calculated working times within the selected period.
Time Correction Request

By clicking the Time Correction Request button, an overlay window opens where employees can submit correction requests for existing time bookings.

Employees can:
- Select the date to be corrected
- Adjust booking periods
- Change the activity type
- Add comments explaining the correction
- Submit the request for approval
Depending on the company configuration, correction requests may require approval by a supervisor or administrator before they become effective. The Send button submits the correction request for further processing.
My Requests

By clicking the My Requests button, employees can view and manage their submitted requests.

The My Requests tab displays all requests created by the logged-in employee.
The following information is available for each request:
- Request number
- Absence type
- Start date
- End date
- Factor
- Number of days
- Approval status
- Comment
- Attachments
Examples of possible request statuses include:
- Pending
- Approved
- Rejected
- Cancelled
The status column allows employees to track the current approval progress of their requests.
Request Absence
The Request Absence button in the upper-right corner opens the absence request form, allowing employees to create a new absence request.
Cancel Request
Absence Overview

By clicking the Absence Overview button, an overview of all personal absences is displayed.

The calendar view provides information about:
- Approved absences
- Vacation days
- Planned absences
- Remaining vacation entitlement
Employees can navigate through different periods and review their absence history. Depending on the assigned permissions, additional information may be available. Any changes are displayed immediately within the calendar view.
Request Absence

By clicking the Request Absence button, a new absence request can be created.

The following information can be entered:
- Employee
- Absence type
- Duration (e.g. Full Day or Half Day)
- Date
- Comment
Available absence types depend on the configuration defined by the administrator. Once all required information has been entered, click the Request Absence button to submit the request. Depending on the company workflow, the request may require approval before it is officially recorded in COBI.time.
Log out

Here you can log out of COBI.time, which must be confirmed again. The following window appears after clicking on “Log out”:

2. Digital Time Clock
Buttons Coming / Business trip
These are primarily used to start the daily time recording. Clicking on the “ Coming” button starts the time recording for the day. There can be also the “Business trip” button, which is displayed to the right of the “Coming” button. It has the same function; the time is started accordingly. There are two options for displaying the “Business trip” button. This can be displayed in general or only if there is an authorised business trip for the day.

Note: The business trip function is not a general function; it is activated by the administrator in the settings if it is relevant for the employees.
Location Selection Button
You can use the “Location” button to select where you are currently working, which will be shown in the attendance list with a corresponding icon visible to colleagues. The icon also appears in the top left-hand corner of the digital time clock.

Standort Icons:

Once the working time has been started, the time worked is displayed in the centre of the grey circle. The time circle changes colour from grey to red to green when the target working time for that day has been reached.
After the working time has been started, the buttons in the digital time clock are changing as follows.

Button „Book Breaks“
This function can be used to start and end breaks. After pressing the “ Break start” button, the “ Break end” button appears automatically.

During the break, the colour of the time circle changes to yellow. The employee is also displayed in yellow in the attendance list so that everyone can see who is currently on a break.

Button „+ Activity“
After starting the working time, you can use the “+Activity” button to book time to projects, service calls, financial projects, or cost centers during the active working session. After clicking the button, the following selection menu appears:


Once the working time has been started, you can use the “+Activity” button to book time on projects, service calls and financial projects within the working time. After clicking on the button, the following selection menu opens:
Once a project has been selected and confirmed, this also appears as information in the digital time clock under the employee's name.
Projects, service calls and financial projects are taken directly from SAP Business One and cannot be created in COBI.time.
The time booking for the project can be ended using the “End project” button. Breaks can also be booked during booking on a project. If no name has been assigned to project stages in SAP, these stages are displayed as an empty field for selection.
The “Search” field can also be used to search for specific projects.
Posting to projects is not a general function; it is activated by the administrator in the system settings and in the authorisation assignment if this is relevant for the employees.
Information Field
In the top right-hand corner of the digital time clock there is an icon where you can call up personal information.

After clicking on the “Show information” icon, the following window opens:

Here you have an overview of the attendance status, the current working time including breaks and the total balance since the employee started using COBI.time. Plus or minus hours are displayed accordingly. In addition, an overview of the total leave (planned, open, unconfirmed and taken) is displayed in the lower half. Furthermore, you can submit both time correction and absence requests from the info window.
E-Mail Notifications
In the top right-hand corner of the info window, you can activate whether you would like to receive an e-mail notification when an absence request has been approved or rejected.

Time correction request
It happens that employees forget to log times or other activities. You can use the following function to submit a request for time correction.

If you select this function, you will get the following mask:
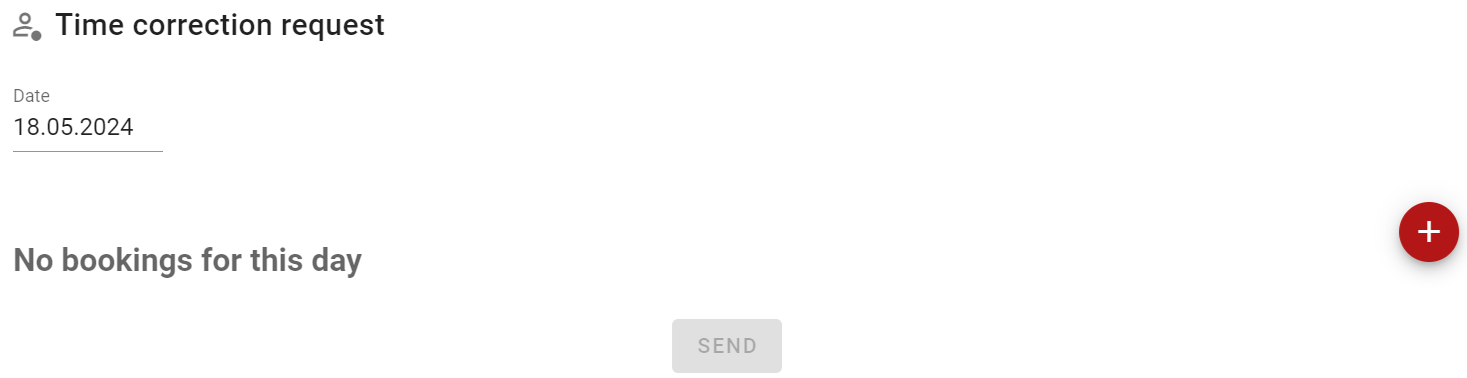
When you click on the date field, the calendar opens; on the days with green dots there is already a time booking that you might want to correct. For days without marking, there is no time booking; you could also request a time correction for a complete day.
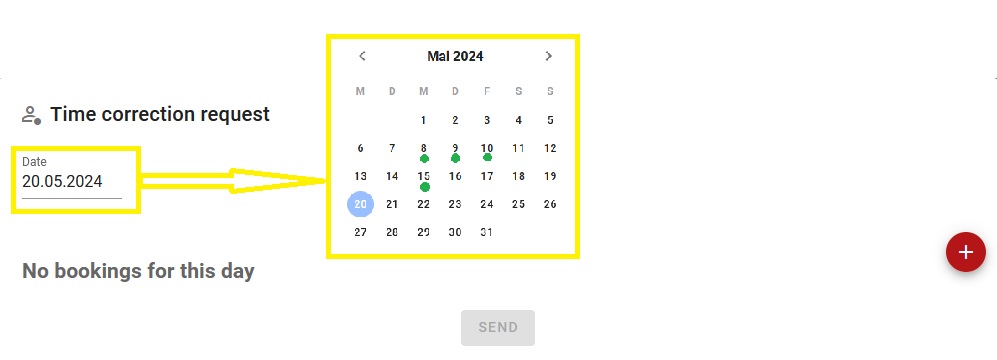
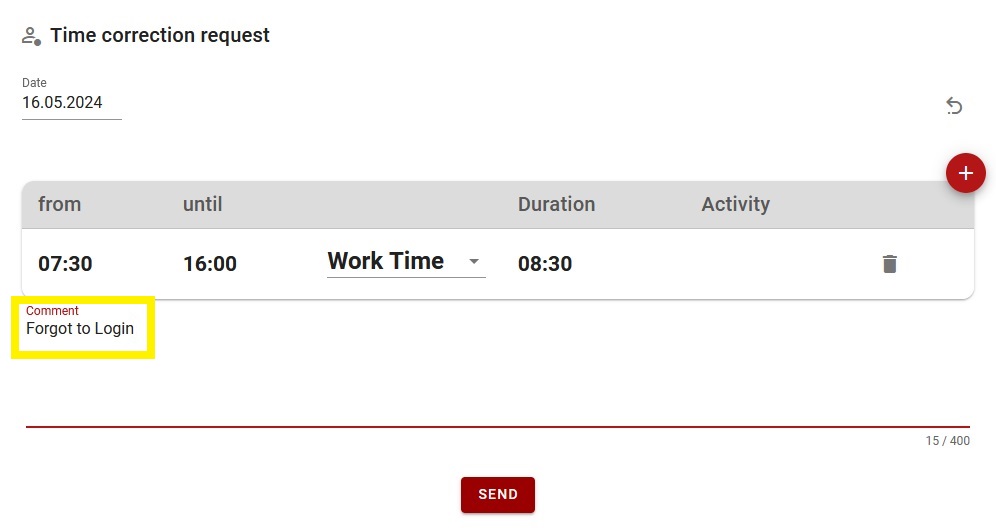
You now select the day on which you would like to request a time correction. In the example below, a day was selected on which the employee forgot to log in in the morning. He did this at 9:42 a.m. and is now submitting a request for a time correction because he started his work at 7:30 a.m.
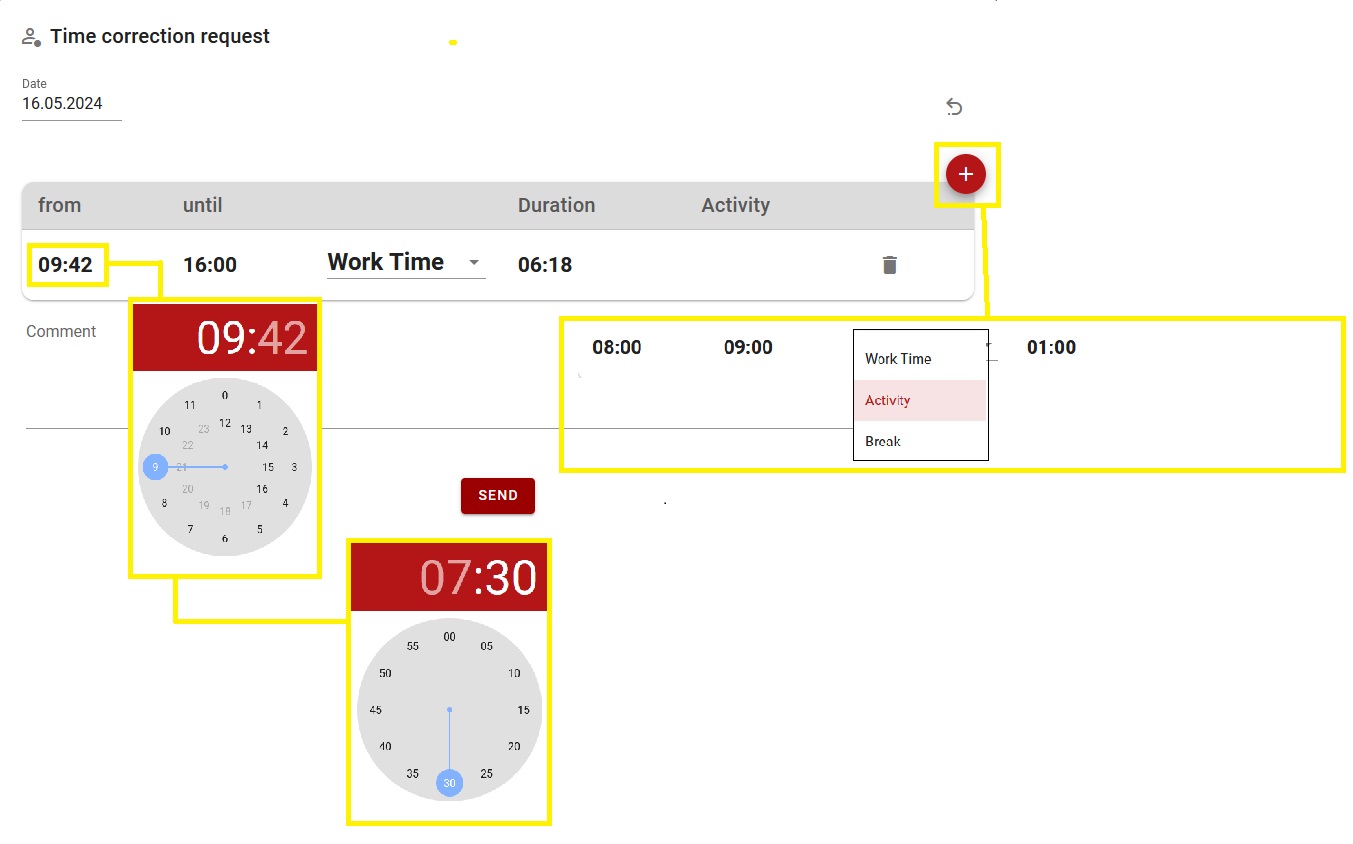
To do this, click on the time you want to correct, in this case 9:42 a.m., and change it to the desired time. You also have the option of using the “Plus” button at the top right to book entire days as working hours or so-called “activities”. When you click on “Activities” the selection window opens, identical to that in the digital time clock (activity button) in which you can see the projects, service calls, financial projects and cost centers. You could request time corrections here if you forgot to book such activities.
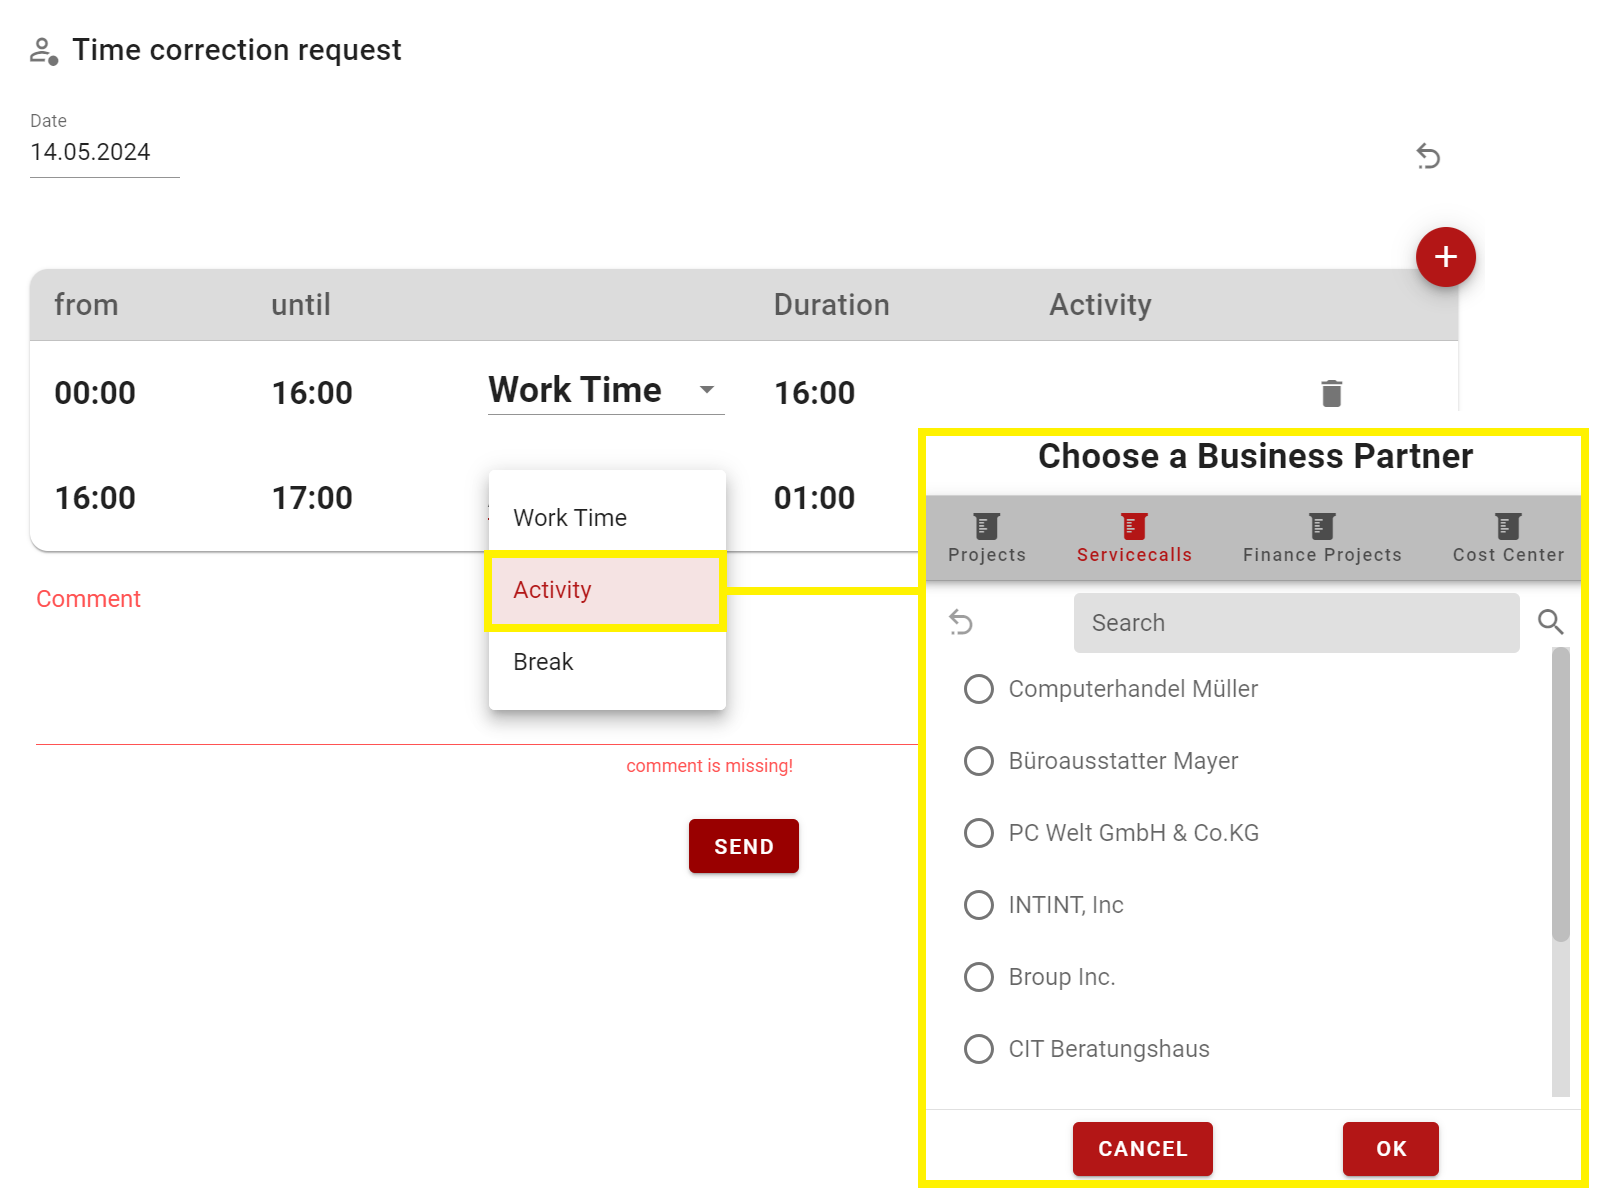
In all cases it is mandatory to enter the reason for the time correction in the comment field, after which the application can be sent. This will be sent to the registered manager/team leader.
3. Attendance List

In the upper-right corner, present and absent employees are displayed.
By clicking on the “Show all” button, you get an overview of all employees or team colleagues, depending on how the administrator has assigned the viewing rights. The attendance list function is the same as the icon in the menu bar under point 1.

Overview Attendance List:

The attendance list has a search function in the top left-hand corner where you can search for colleagues by first name or surname. There is also a filter function in which you can display departments separately. You can also tick the box next to it to display only colleagues who are present.
The status of the colleagues can be recognised by the highlighted colour or the displayed symbols, see legend on the right of the image.
4. Notifications
The notification field shows when absence requests have been approved or rejected. Alternatively, you can use the e-mail function as described under point 2. Digital time clock - e-mail notifications.
5. Monthly Overview
In the monthly overview, you can see your average working and break time and the corresponding balance.
By clicking on the “Show history” button, you can jump to the identical history as under point 2. Digital time clock - monthly history.

Additional Modules
Depending on the rights assigned by the administrator, the employee could be shown an additional module in the menu bar on the left, the manual time recording.

There are two options here:
1. if only the “Manual time entry” right has been assigned, the following window opens:

The employee has the option of booking times in the past only.
2. The rights “Manual time recording” and “Project times” have been assigned, then the following extended window opens:

The employee has the option of booking times on projects, business partners and service calls etc., e.g. on the previous day or in the past. In both cases, click in the corresponding fields and select the desired times or projects, business partners, service calls, etc.
Note:
The right of manual time booking is rarely assigned to employees alone.
This would be used, for example, if the employee had forgotten to log in or out of COBI.time the day before and now wants to enter the working time accordingly.
These processes are usually authorised by the line manager with appropriate comments.
The manual time booking authorisation in conjunction with the project times authorisation is assigned more frequently.
Here, employees have the option of adding project times in the past as part of their working time.
Ultimately, the assignment of rights for both aspects depend on how the company policy is defined.